
 |
|
|
||
|
Maxim
Kischine
|
||
|
|
|
Castlevania:
Harmony of Dissonance
|
He shows up in most of the game's cut-scenes, including the intros, meetings with Juste, and the best ending |
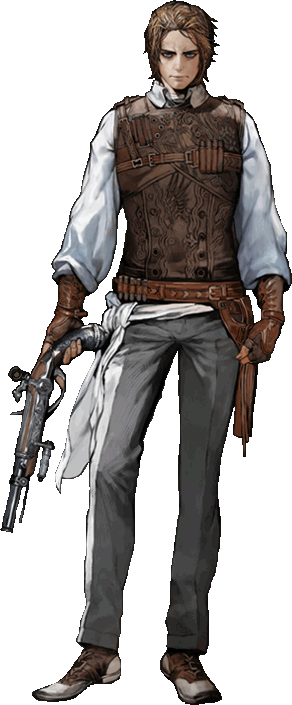
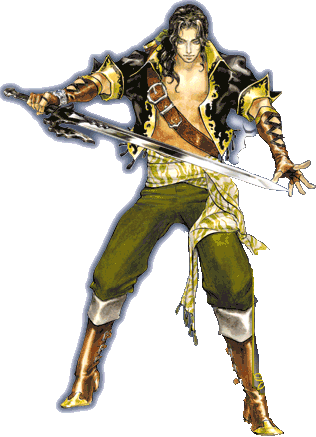 Maxim
is only one of many Belmont descendants of a different surname. By this time,
it was common that different Belmont heroes would actually compete for the
honor to be recognized as the next great hunter in line. Like the future Hugh
Baldwin, Maxim was forced to play second fiddle to another blood Belmont and
great friend, Juste.
Maxim
is only one of many Belmont descendants of a different surname. By this time,
it was common that different Belmont heroes would actually compete for the
honor to be recognized as the next great hunter in line. Like the future Hugh
Baldwin, Maxim was forced to play second fiddle to another blood Belmont and
great friend, Juste.
When the determined warrior was shunned by the Belmont elders who decided that Juste was more capable of receiving the title of "Vampire Killer," the disappointed Maxim set out on a two-year training expedition to hone his skills. In order to prove his worth, he decided, brazenly, to attempt to do what Simon Belmont had done years earlier: He would search all of Transylvania to gather up Dracula's remains and take them to the ruins of Castlevania to burn them, hopefully, he thought, to resurrect the Dark Lord and quickly defeat him in a duel.
The plan backfired mightily: By collecting the remains of Dracula, it led to a series of events that saw the Count's spirit possess his body. In order to precipitate a worthwhile resurrection, he used Maxim memories to his advantage for a dual purpose: He would abduct Lydie Erlanger and take her to the castle, and he would bring his own remains along to set in motion a sacrificial ritual. To stall any would-be heroes, the Count used the conflicting energies of his new body to mask Castlevania's presence by creating a second, transient castle, which would surely confuse not just the hunters but even his own forces.
Maxim, amazingly, fought off the possession long enough to do the right thing; to delay Dracula's rising and thus protect Lydie, he hid both her and the body parts through the two castles before escaping. He then picked himself up, his memory waning, to warn Juste of these events. Though he wanted to redeem himself, he wound up becoming both a help and a hindrance to Juste's adventure's following because of the Count's possession and mind games. Still, Juste continued to believe in his friend, a strong gesture that gave Maxim the will to fight long enough to rid himself of Dracula's contamination.
 |
|
|
||
|
Annet
Renard
|
||
|
|
|
Castlevania:
Dracula X
|
 |
Dracula X: Rondo
of Blood
|
|
She
can be rescued on secret Stage 5b; she appears at game's end only if
you save her on the secret stage
|
She's
incarcerated on Stage 7, locked away in a small clock tower room (click
here for her location)
|
|
Annet, herself, was locked away near the castle keep, in the preceding clock tower (or in the caverns, if you prefer Castlevania: Dracula X's truncated story). From here, Dracula could keep an eye on her while further taunting Richter. When Richter arrived in the clock tower, he located the key to her chamber in an eagle's nest in a branching corridor, and this is all that stood in the way of his beloved. It was easy, yes--but Dracula's only interest was to goad Richter this far. Her saving holds more relevance toward the story continuation of both games: In Rondo of Blood, her rescue counts towards your completion percentage and thus the best ending. And in Castlevania: Dracula X, saving her opens up a hidden stage, and, thereafter, an alternate boss on the clock tower stage whose defeat unlocks the game's best ending. |
 Annet
Renard was Richter Belmont's girlfriend, and it was her fate, too, to
become a pawn in the eternal play. After Dracula was risen from his
slumber by Shaft and his deviant followers, he cooked up a plan that
saw his forces ravage Warakiya and take some of the town women hostage
in hope of luring a Belmont hero to his castle for a duel. The skeletal
and demon perpetrators grabbed Annet, her younger sister, Maria, plus
others and imprisoned them in ghoulish locations surrounding the castle.
Annet
Renard was Richter Belmont's girlfriend, and it was her fate, too, to
become a pawn in the eternal play. After Dracula was risen from his
slumber by Shaft and his deviant followers, he cooked up a plan that
saw his forces ravage Warakiya and take some of the town women hostage
in hope of luring a Belmont hero to his castle for a duel. The skeletal
and demon perpetrators grabbed Annet, her younger sister, Maria, plus
others and imprisoned them in ghoulish locations surrounding the castle.
  |
|
|
||
|
Iris
and Tera
|
||
|
|
| Tera is held captive on Stage 3' in a small cave, and Iris is being held on Stage 4' in a small built-in bedroom (click here for how to find them) | ||
|
Dracula
X: Rondo of Blood
|
||
|
Both of the women were held in high esteem in Warakiya because of the specific roles they played: Iris worked as a nurse, a kind medicine woman who would tend to wounded villagers and cure their ailments. Tera was one of the town's religious leaders (as a nun, specifically), and she would maintain the church and lead the townspeople in prayer. Their professions made them natural targets for Dracula's dark forces. Iris was stashed away in the woodland, in a chamber forged under its many bridges, and Tera was taken to the graveyard, where she was placed in a catacomb below the remains of a skeleton dragon. During his journey, Richter and Maria made sure to rescue the pair. As it is with Annet, their saving will have an effect on the way your mission concludes: By finding each woman along the game's alternate paths, it will allow you to obtain the best completion rate and earn the best ending. |

 When
Dracula's forces ravaged the town and kidnapped Annet in attempt to
lure Richter into his trap, they were also sure to cripple the town's
resources by nabbing any other important women they could find. Mainly,
they abducted two unfortunate victims in Iris and Tera.
When
Dracula's forces ravaged the town and kidnapped Annet in attempt to
lure Richter into his trap, they were also sure to cripple the town's
resources by nabbing any other important women they could find. Mainly,
they abducted two unfortunate victims in Iris and Tera.
 |
|
|
||
|
The
Master Librarian
|
||
|
|
|
Castlevania:
Symphony of the Night
|
The Librarian resides in a small book-filled den within the Long Library |
|
No one was more surprised than he to see Alucard emerge into his tiny den within the long library when the two hadn't been in contact for hundreds of years. Though the Librarian's allegiance was strongest with Dracula, he couldn't suppress his true nature to help the less fortunate, especially if they had something to offer in return. While Alucard certainly wasn't in that class, the Librarian readily made his services available to the half-breed hero when promised a huge reward in return. (Perhaps his redemption? We never learned.) To such a soul, wealth and security were always of the utmost assurance. Of course, his services are more yours than Alucard's: After his trust is earned, in-game, the Librarian will begin to function similarly to the merchants of games' past only with more in the way of information. He'll sell to you stronger armor and weaponry, he'll buy from you gems and other valuable stones, he'll list for you the many enemies and their statistics, and he'll furthermore supply valuable tips on how to defeat the game's strongest enemies. After the game is cleared, his den will also be the site of Symphony's sound test. |
 The
master Librarian is a longtime ally of both Count Dracula and his son,
Alucard, and throughout the eons, he resided in the castle's huge library
where it was his job to maintain the castle's wealth of informational
pieces. The Master Librarian thereby became a very fountain of this
information.
The
master Librarian is a longtime ally of both Count Dracula and his son,
Alucard, and throughout the eons, he resided in the castle's huge library
where it was his job to maintain the castle's wealth of informational
pieces. The Master Librarian thereby became a very fountain of this
information.
 |
|
|
||
|
Lisa
|
||
|
|
| Lisa is only mentioned in the instruction manual, but she does make a sort-of appearance as an illusion used subconsciously by the Succubus to seduce Alucard | ||
|
Castlevania:
Symphony of the Night
|
||
|
Not surprisingly, as Lisa learned to love him, his hatred toward God did not resonate onto her, because it was never in her nature to hate. In fact, she loved Vlad more than anything in the world despite his flawed vision. To others, Lisa was known as the very kind woman who sacrificed all of her time to medicine, and she would prepare all kinds of remedies for the sick and weary. Due to the paranoid nature prevalent in this time-period, when people lived in fear of the forces of darkness, a rumor spread that Lisa's medicinal practices were so effective because she was a witch. Thus, the authorities arrested her, tried her as a witch without much proof, and executed Lisa immediately thereafter. This was an act that drove Vlad to insanity and became the driving force behind his lust for revenge against the humans. Though, there remained one true connection between the two: The baby to which Lisa gave birth shortly before her death--Adrian Farenheights Tepes, better known as Alucard. Right before her execution, she made Alucard promise to deliver to his father two messages: "Do not do the humans any harm," she'd ask, "for theirs is already a hard lot." Also, she needed that Vlad know one more thing: "Tell him," she said, "that I will love him for all of eternity." In Symphony, Lisa's is more a pseudo-apperance: The Succubus tries to play upon Alucard's conflicted status by taking Lisa's form, in an attempt to enrage him enough to where he'd join in evil's cause almost unwittingly (as in Luke Skywalker "joining the dark side"). Thereafter, after defeating Dracula, Alucard speaks to him the words he promised his mother he'd relay. |
 Lisa
was the woman with whom Vlad Tepes Dracula fell in love after becoming
a vampire. After the death of his first wife, Vlad waited patiently
for countless years, for he believed that she would one day be reborn
so that they could be together again. When he met Lisa, he was convinced
that she was his beloved reborn.
Lisa
was the woman with whom Vlad Tepes Dracula fell in love after becoming
a vampire. After the death of his first wife, Vlad waited patiently
for countless years, for he believed that she would one day be reborn
so that they could be together again. When he met Lisa, he was convinced
that she was his beloved reborn.
 |
|
|
||
|
Maria
Renard
|
||
|
|
|
Castlevania: Dracula
X
|
|
Castlevania: Symphony
of the Night
|
|
She's
in the catacombs of Stage 4 behind a locked door
|
She
shows up several times to confront Alucard. (Note: In the Sega Saturn
version, she also acts as a boss)
|
 Maria
Renard was the younger sister of Annet Renard, Richter Belmont's girlfriend,
and served as a strong presence in their lives. The young Maria, though naive,
was fiery, determined and driven by her belief in people and ultimate good.
Too, she was gifted with great
magical powers--hers the power of nature, an unexplainable connection to animals
and a deep understanding of their ecology.
Maria
Renard was the younger sister of Annet Renard, Richter Belmont's girlfriend,
and served as a strong presence in their lives. The young Maria, though naive,
was fiery, determined and driven by her belief in people and ultimate good.
Too, she was gifted with great
magical powers--hers the power of nature, an unexplainable connection to animals
and a deep understanding of their ecology.
So when Dracula sought to gain leverage over Richter Belmont by ordering his dark forces to ravage Warakiya and kidnap those close to Richter's heart, it was no surprise that Maria was among their many targets. Not even her youthful appearance was a good enough cover--Shaft, in testing her soul against his wicked magic, came to grasp the extent of her power and just how great a threat such a being could be to the master, Count Dracula.
Maria was hauled off to a chamber within Castlevania's main halls, where Shaft would conduct his dark experiments. Richter arrived in time to break Shaft's spell and thus rescue the tenacious Maria, who was more than prepared to accompany him for the rest of the adventure--until, she insisted, Dracula's eventual defeat. (Mainly, in Rondo of Blood, she becomes a playable character after this rescue. Note, though, that in the Castlevania: Dracula X version of the story, she's instead captive in the catacombs and is only there to be rescued. For continuity's sake, we stick with Rondo's as the true story.)
Five years later, and one year after Richter disappeared suddenly, it was Maria that set out to look for him. She entered into the recently re-risen and beckoning Castlevania only to run into Alucard, to whom she took a strong liking. While herself unsuccessful in finding Richter, she offered her assistance to Alucard and played a crucial role in the half-breed's campaign to solve the mystery; most notably, she offered him the holy glasses that helped him to discover that Richter Belmont was alive and well and under the still-dwelling Shaft's control.
After the defeat of Shaft, and later Dracula, Alucard escaped the castle to find Richter and Maria waiting. When Alucard revealed that it was necessary to purge from this world his own cursed bloodline, the smitten Maria wasn't ready to let him get away even if logic would not permit it; releasing Maria from her state of confused emotions were Richter's encouraging words, which gave her the strength to chase after him.
 |
|
|
||
|
Barlowe
|
||
|
|
| Barlowe remains at Ecclesia, where he frequently serves as a storyline-driving figure until later encountered as a boss | ||
|
Castlevania:
Order of Ecclesia
|
||
|
One such brave soul was Barlowe, who formed an organization called Ecclesia. It was Ecclesia's mission to study "glyphs" (magical energy representative of the power that dwells within all things) and one day put them to use as the means for fighting Dracula. Their efforts were so considerable that certain men of power took notice and entrusted to Barlowe the vessel for the soul of Dracula, in hope that Ecclesia's research would materialize in a weapon potent enough to destroy the Dark Lord. Furthermore, he was ordered to seal away the vessel and release it from captivation only when a final solution was apparent. There was one technicality: Should their research ultimately prove invalid, the vessel would be taken away from them. Barlowe agreed to these terms. Ecclesia concocted several glyphs and used them against the vessel. Not one of them could even scratch it. If those in power found out, they would surely take it back, leaving Ecclesia in ruin. They managed to keep their failure a secret, securing the vessel, and continued experimenting. Finally, Barlowe came up with a solution: Fight fire with fire! His research, helped along by Albus--his star pupil and Ecclesia's chief researcher--culminated in the creation of Dominus, a glyph of ultimate power. Dominus was the representation of the Count Dracula (the mystical combination of hatred, anger and agony), which they magically altered to be used as a weapon against the Dark Lord. What his students didn't know (except possibly for Albus, who despite being kept largely in the dark was working closely with him) was that Barlowe could not resist the vessel's allure and was actively studying it rather than keeping a safe distance; Dominus' very existence was in fact based upon the samples taken directly from the vessel, which contained Dracula's actual body parts. Somewhere along the way, things went awry; Barlowe, thanks to frequent contact, was corrupted by the vessel's power and became engulfed in darkness, which he managed to hide from his students while he plotted to resurrect Count Dracula, the very opposite of his original goal. He began hatching a sinister scheme. In order to bring about Dracula's return, he'd have to sacrifice his students and somehow do so with their blessing. He used Dominus, being the bearer of which was seen as an honor, as the catalyst. He chose Shanoa, a woman gifted with the ability to absorb and harness glyphs, as the one to bear Dominus, under the guise that she'd use this power to fight Dracula. When Albus, who knew of Dominus' self-destructive power, sought to protect Shanoa by convincing Barlowe to instead entrust him with the "honor," the old man reluctantly agreed. Though, he had no intention of keeping that promise; in order to take Albus out of the picture, he sent him a great errand and in the meantime hoped to infuse Shanoa with Dominus, knowing it would kill her and serve as the perfect sacrifice. Even though Albus returned in time to stop it from happening, interrupting the ceremony and stealing away Dominus for himself, Barlowe was able to salvage the event by instead sacrificing Shanoa's memories and emotions. When she awakened in an amnesiac state, he lied to her, insisting that it was Albus' intervention that led to the loss of her memory. He then sent her on a mission to track down Albus and retrieve Dominus, as if Albus was simply a misguided youth seeking ultimate power. Barlowe remained at Ecclesia and during conversations with the multitasking Shanoa managed to play coy, showing no hint of ill-intent and appearing as completely sincere. For now, he could only encourage her to continue on Albus' trail, eliminating him if necessary. When Shanoa finally began to figure it all out, thanks to the now-understood actions of Albus, she confronted Barlowe, who revealed the vessel's existence but nothing more. She was eventually forced to slay Albus, who was overpowered by Dominus but lived on in her memory as the brother she once knew; she returned to Ecclesia and honoring her promise to the fallen Albus refused to use Dominus on the vessel, as Barlowe requested. She called Barlowe on his lies, knowing of his evil deeds. He started to deny the charges, but his tone only grew more apologetic, as if his actions were simply misunderstood. "Shanoa," he said, "if you ever trusted me, then hear me: Mankind needs you. Needs your life!" It was now clear that Barlowe was under Dracula's control. The now-mad Barlowe, laughing maniacally, began an assault on Shanoa. Soon, he was brought to his knees, utterly defeated. Without Dominus, he explained, he could never destroy the seal and release Dracula into this world, which was "the realization of Ecclesia's mission and the singular wish of all mankind." Mimicking Dracula's words, Barlowe stated that it is indeed mankind's wish, that their hearts yearn for his presence; if not, why would he return again and again? The enchanted Barlowe, his strength returning, began hovering, gravitating toward toward the vessel. Sensing the imminent return of Dracula, he used what remained of his power to destroy the already cracked seal, sacrificing himself to the cause. Shanoa watched as the vessel exploded, vaporizing Barlowe in the process. Barlowe was successful in resurrecting Dracula, his last act in this world though the antithesis of Ecclesia's original ambition. Though it isn't easy to justify blaming Barlowe for his inability to resist the darkness, it's due to his actions that all record of the disgraced Ecclesia would vanish into the mists of time. |
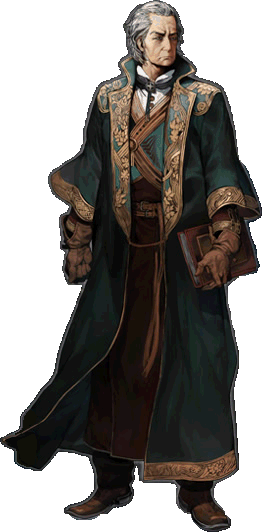 The
early 19th century was a desperate time for mankind. The Belmont clan
had gone missing, the specter of Count Dracula continued to loom over
Transylvania, and people began to lose their ability to resist darkness.
Fearing the worst, those in positions of power began to search for new
ways to counter Dracula. A brave few formed organizations whose purpose
was to prevent the return of count Dracula and in the event of his resurrection
remove him from this world.
The
early 19th century was a desperate time for mankind. The Belmont clan
had gone missing, the specter of Count Dracula continued to loom over
Transylvania, and people began to lose their ability to resist darkness.
Fearing the worst, those in positions of power began to search for new
ways to counter Dracula. A brave few formed organizations whose purpose
was to prevent the return of count Dracula and in the event of his resurrection
remove him from this world.
 |
|
|
||
|
Albus
|
||
|
|
| Albus, too, appears in story-based sequences but makes appearances in areas game-wide; he's ultimately met as a boss and thereafter continues appearing in scenes | ||
|
Castlevania:
Order of Ecclesia
|
||
|
Albus was very close friends with Shanoa, the equivalent of her brother. Albus cared for Shanoa so much that he would do anything he could to prevent her from accepting Dominus, the true meaning of which was lost on her; Albus knew that the accepting of Dominus would interfere with one's memory and emotions, a risking of one's own life. To ensure that she would not receive it, he met with Barlowe and persuaded him to change his mind--to select Albus even though both knew he hadn't the capacity to absorb Dominus. Or at least not yet. Barlowe gave the youth his word before sending him out on a great errand. As the day of the ceremony neared, whence Shanoa would become the bearer of Dominus, Albus sensed something was wrong and returned to Ecclesia, where on the special day he was informed by Shanoa that Barlowe had changed his mind--that Albus was unfit to bear such a responsibility. This set Albus into a rage. He later interrupted the ceremony, charging Barlowe with an act of deceit, before somehow stealing Dominus for himself and quickly escaping. Albus knew that he had little time to act; he had only a few weeks to find a way to control this chaotic glyph and properly harness Dominus as the means to destroy Dracula before Shanoa could catch up to him, seeking what she didn't know was a highly self-destructive power. During his previous errand, Albus pieced together that Barlowe's aspirations were anything but sincere, and he didn't want to see Shanoa used as a pawn in a deadly game. His travels led him to a village called Wygol, which he had researched to discover was home to descendants of the Belmont clan. He took captive several of its habitants with the intention of taking samples of their sacred blood, hoping that it could act as a conduit to contain Dominus. That the village's founder, Nikolai, thought him to be Dracula was a realistic outcome more than a fear. As Albus had guessed, the power of Dominus began to corrupt him, so he thought up a temporary solution. When the amnesiac Shanoa caught up to him on Minera Prison Island, requesting that he return to Ecclesia, he left to her care the splintered Dominus Hatred, one of the trio, hoping that it would slow the rate of corruption and buy him more time; he repeated this action when they later met in the Giant's dwelling, this time entrusting to her Dominus Anger. He encouraged the confused Shanoa to question Dominus' source, to speak to Barlowe and perhaps learn the truth as he had. By the time of their final physical meeting, it was too late--Albus was overpowered by even one piece of Dominus and now sought to retrieve the two pieces of Dominus he had previously given to Shanoa, violently if necessary. "All of humanity is merely cattle, led to slaughter at my behest. I, Lord Dracula!" he shouted, underlining to Shanoa the severity of the situation. She had no choice but to fight and defeat her former friend, to reclaim the final piece of Dominus. But Albus wasn't truly dead. Once Shanoa absorbed Dominus Agony, reuniting the whole of Dominus, she was overcome by an odd sensation and could somehow see into Albus' memories, quickly learning that his actions were only meant to protect her; Albus was able to live on as merely a vision, a remnant living within the Dominus glyph as absorbed by Shanoa--a divine occurrence made possible by the Vampire Killer whip's legacy and specifically Shanoa's absorbing of the glyphs that Albus had created to encase the Wygol village habitants (now known to her as Belmont descendants). Too, she learned the truth about Barlowe's scheme and was encouraged to confront him on the matter, before which Albus made her promise to never, under any circumstances, use Dominus. Trusting his words, she agreed. Shanoa was unable to keep her promise, as she was forced to call upon Dominus to destroy the seemingly invincible Count Dracula; she would surely pay for tapping into its power with her life. As she prepared to exit this world, almost desiring of such a fate, Albus again appeared to her. While the despondent Shanoa was going about her final mission, Albus was wandering within Dominus to see if he could locate the memories it had stolen from her. Once Dominus had rushed away, having acted as the catalyst in Dracula's destruction, it left behind a glimmer--the sacrifice she had just made. Using what was left of his fading influence, Albus supplanted the radiant signal, effectively sacrificing his soul to spare Shanoa's life. While he had no regrets in doing so, he asked of the distressed Shanoa one final wish: To smile for him. Though she was suffering, she found the energy to grant his request, a sight he found beautiful enough to mark his passing. After all: What kind of brother would he be if he didn't protect her? |
 Albus
was Ecclesia's chief researcher and like Shanoa trained from an early
age to harness Dominus and destroy Count Dracula. Due to his dedication
to research, the supreme pupil became Barlowe's trusted assistant. In
addition to his prowess as a top researcher, he was also a warrior highly
skilled in the use of magic; armed with a pistol named Argatha, Albus
could channel glyph energy into bullets, which would then manifest as
magical projectiles.
Albus
was Ecclesia's chief researcher and like Shanoa trained from an early
age to harness Dominus and destroy Count Dracula. Due to his dedication
to research, the supreme pupil became Barlowe's trusted assistant. In
addition to his prowess as a top researcher, he was also a warrior highly
skilled in the use of magic; armed with a pistol named Argatha, Albus
could channel glyph energy into bullets, which would then manifest as
magical projectiles.
 |
|
|
||
|
Morris
Baldwin
|
||
|
|
| He leads the hunters in the intro scene and is taken prisoner, placed in the Ceremonial Room, where he's later rescued | ||
|
Castlevania:
Circle of the Moon
|
||
|
When Dracula did indeed return to this world, early, it was Morris Baldwin and members of said Graves family who battled the resilient Count and removed him from this world. After the epic struggle, Morris came to realize the near-unlimited power of Dracula, and in researching history, he lived in fear that Dracula might return sooner than believed--that his followers would seize a golden opportunity, a Belmont-less scenario, and hastily try again, or that Dracula was simply feigning defeat in order to hide out and over time regenerate enough power to orchestrate a surprise return. To prepare for such an event, he took under his wing two youths: His son, Hugh Baldwin, and Nathan Graves, the offspring of his relatives; he trained the two boys to be expert vampire hunters. Though, in a move that shocked everyone, Morris, as the elder entrusted with the whip and the weapons, decided that Nathan should be the next hunter in line and not Hugh, his son, who seemed to be the more logical choice. This decision affected the two youths in different ways. Morris was deeply disappointed to learn that Hugh came to despise Nathan, his former friend, who he now saw as his bitter rival. Years later, notwithstanding, the event that Morris feared was coming to fruition: The countess Camilla had been resurrected and was preparing to do the same for her master, Lord Dracula. Morris and his students sensed this imbalance in nature and sped toward the castle to prevent such a ritual from occurring. They were too late, and for Morris, this resulted in his untimely capture, wherein Dracula would slowly drain the old hunting master's life-force and use it to replenish his own. Morris survived the process long enough for Nathan, and later Hugh, to arrive and carry him off to safety. While Hugh was proud of Nathan's efforts in vanquishing Dracula from this world, he was even more proud of the fact that through their castle-wide encounters his two students learned to work out their differences and accept their separate distinctions. |
 Ten
years before the events of Castlevania: Circle of the Moon, there
existed an untold tale of Dracula versus the family of legend (or at
least a faction of the family bearing blood relation to the Belmonts).
After Richter Belmont vanquished from this world the hated Count, the
clan pulled a disappearing act and relinquished possession of the Vampire
Killer and the mystic sub-weapons due to an unexplored policy that it
not again touch the hardware
until Dracula's next in-cycle resurrection--one requiring approximately
one hundred years of rest on the part of the Dark Lord. Fearing that
deviants, as they always had, might attempt to resurrect Dracula early,
the clan left the weapons to the care of the Baldwin and Graves warriors,
who were related to the Belmonts by blood. It would be their job to
in the meantime counter any threat.
Ten
years before the events of Castlevania: Circle of the Moon, there
existed an untold tale of Dracula versus the family of legend (or at
least a faction of the family bearing blood relation to the Belmonts).
After Richter Belmont vanquished from this world the hated Count, the
clan pulled a disappearing act and relinquished possession of the Vampire
Killer and the mystic sub-weapons due to an unexplored policy that it
not again touch the hardware
until Dracula's next in-cycle resurrection--one requiring approximately
one hundred years of rest on the part of the Dark Lord. Fearing that
deviants, as they always had, might attempt to resurrect Dracula early,
the clan left the weapons to the care of the Baldwin and Graves warriors,
who were related to the Belmonts by blood. It would be their job to
in the meantime counter any threat.
 |
|
|
||
|
Hugh
Baldwin
|
||
|
|
| He's alongside Nathan in the intro; he also runs into Nathan in the Machine Tower and Chapel Tower; he's later a boss in the Observation Tower | ||
|
Castlevania:
Circle of the Moon
|
||
|
It was obvious from observing their training that Hugh was superior in terms of skill, and Hugh always showed great pride in that position. However, when his father started to favor Nathan, it was beyond his understanding. "What was it that his father saw?" everyone wondered. Over time, the constant attention paid to Nathan began to make Hugh feel resentful, jealous and even hateful. Finally, Hugh was pushed over the edge when Morris Baldwin, the elder, presented to Nathan the Vampire Killer whip and the sub-weapons rather than to Hugh, who proved to be more skillful. When the trio arrived at the castle, a preemptive strike by Dracula landed Hugh and Nathan in the castle's catacombs. Hugh broke free from Nathan, pushing him aside, and set out to look for his master. He was having little to no luck and became bitter when Nathan was able to make better progress. The hate grew so much that Hugh's mind became clouded, and he was easy prey for Dracula's dark magic. Nathan learned this all too well when he entered the castle keep only to be attacked by a nearly possessed Hugh. When Nathan emerged victorious, knocking some sense into him (or knocking the spell's influence out of him, as it were), Hugh, who had been watching himself externally, helplessly, came to finally understand why his father made the decision to hand down the weapons to Nathan. The humbled Baldwin gave Nathan his blessing to finish the search and bring their master to safety, and he vowed, thereafter, to restart his training with a newfound respect. |
 Hugh
is the son of Morris Baldwin and, like many others, a Belmont descendant
of a different surname. Because of the strong bond between the Baldwin
and Graves families, he and Nathan became great friends during their
years of training under the watchful eye of Morris.
Hugh
is the son of Morris Baldwin and, like many others, a Belmont descendant
of a different surname. Because of the strong bond between the Baldwin
and Graves families, he and Nathan became great friends during their
years of training under the watchful eye of Morris.|
[Home] [What's New?] [CV Library] [Stages] [Reviews] [Weapons] [Castleography] [Multimedia] [Codes] [Links] |
||||