
![]() Helping Hands
Helping Hands ![]()
The Belmonts aren't the only ones who wanted, especially, to see Count Dracula's demise. For instance: Even some of the more common people that had fallen victim to his attacks on Europe were ready to do their part in seeing him vanquished. Indeed, the Belmonts have assisted in their efforts and gained many loyal acquaintances over the centuries. There were others that helped to further the story along in their own unique way by aiding the heroes when need be. On these pages, you'll read about these sometimes intangible elements. For more-exclusive supporting cast members, including minor players, please click the "Supporting Cast" links on each of the game pages.
 |
|
|
||
|
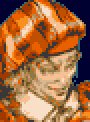
Sara
Trantoul
|
||
|
|
|
Castlevania:
Lament of Innocence
|
She appears in Walter's arms after the defeat of the five guardians and through the proceeding cut-scene |
|
Leon took her to Rinaldo's cottage where her vampirism was diagnosed. The only way to cure her condition, Rindaldo informed, lay in the timely defeat of Walter. But this was an impossible task under these conditions. Knowing that her doom was imminent, Sara volunteered to offer her spirit to the cause--she would allow Leon to strike her down, which would combine her soul with his hatred to transform the Whip of Alchemy into the all-powerful Vampire Killer and counter the ebony stone's effects, this so that no other would ever suffer her cursed fate. Leon had no other choice, and, with a deep sadness in his heart, he ended her pain with a swing of the whip. With its new power, Leon used the whip to vanquish both Walter and even the divine Death. Though Sara had perished for the cause, her very essence inspired Leon to honor her dying wish. |
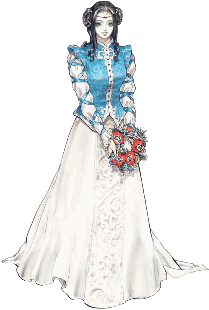 Sara
Trantoul was Leon Belmont's betrothed, his beloved companion who he
would one day marry. As the daughter of a wealthy landowner, she was
adored by all. When monsters began appearing in his domain, Leon struggled
against the Catholic Church's restriction that he not fight any unauthorized
battles. While such events were underway, the time was right for Walter
Bernhard to swoop in and kidnap her, to use her abduction to goad Leon
into a battle at his castle. When Mathias told him where he had to go,
Leon raced to the castle, destroyed the five guardians that blocked
the way, and found Sara in Walter's possession; having vampirized her,
extracting his pleasure, she was of no longer need to Walter.
Sara
Trantoul was Leon Belmont's betrothed, his beloved companion who he
would one day marry. As the daughter of a wealthy landowner, she was
adored by all. When monsters began appearing in his domain, Leon struggled
against the Catholic Church's restriction that he not fight any unauthorized
battles. While such events were underway, the time was right for Walter
Bernhard to swoop in and kidnap her, to use her abduction to goad Leon
into a battle at his castle. When Mathias told him where he had to go,
Leon raced to the castle, destroyed the five guardians that blocked
the way, and found Sara in Walter's possession; having vampirized her,
extracting his pleasure, she was of no longer need to Walter.
 |
|
|
||
|
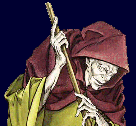
Rinaldo
Gandolfi
|
||
|
|
|
Castlevania:
Lament of Innocence
|
He appears in the mission's intro and can be found at the cottage outside the castle at any time |
|
When Leon much later learned of the death of Rinaldo's daughter, his new ally's pain became part of the impetus behind his quest. Soon, Leon returned to his cottage with the vampirized Sara, and it was Rinaldo who knew what had to be done: If Leon wanted to defeat Walter, he'd have to use something of vampire against him--mainly the part of him that now infected Sara. She would have to die by Leon's hands to create the ultimate weapon to deal with the threat. Sara, of course, volunteered to become one with the Whip of Alchemy in order to create the Vampire Killer whip that could defeat Walter. His hunch proved to be correct: When Rinaldo saw sunlight beam through his window, he knew that the deed was done, and from that moment on, he was able to find the peace that eluded him. |
 Rinaldo
Gandolfi was an alchemist who lived in the forest ruled by vampires--the
Forest of Eternal Darkness where Walter Bernhard ruled from his castle.
Sometime before Lament's tale, Walter had killed his daughter
to try to goad him into a duel. Showing remarkable restraint, Rinaldo
knew his limitations. So instead, since none could ever leave the forest
after entering, the grieving Rinaldo had to make the best of it by building
a cottage and from there continuing his practice. He
was allowed to live here because Walter thought it more fun to have
someone who could assist foolhardy hunters with his magical items--to
make his game of cat and mouse more entertaining. When Leon came into
his cottage, Rinaldo did what Walter had hoped: He supplied Leon with
the Whip of Alchemy and used his powers to enchant the young warrior's
gauntlet for the purpose of wielding magical power; he further assisted
by supplying potions and other goods.
Rinaldo
Gandolfi was an alchemist who lived in the forest ruled by vampires--the
Forest of Eternal Darkness where Walter Bernhard ruled from his castle.
Sometime before Lament's tale, Walter had killed his daughter
to try to goad him into a duel. Showing remarkable restraint, Rinaldo
knew his limitations. So instead, since none could ever leave the forest
after entering, the grieving Rinaldo had to make the best of it by building
a cottage and from there continuing his practice. He
was allowed to live here because Walter thought it more fun to have
someone who could assist foolhardy hunters with his magical items--to
make his game of cat and mouse more entertaining. When Leon came into
his cottage, Rinaldo did what Walter had hoped: He supplied Leon with
the Whip of Alchemy and used his powers to enchant the young warrior's
gauntlet for the purpose of wielding magical power; he further assisted
by supplying potions and other goods.
 |
|
|
||
|
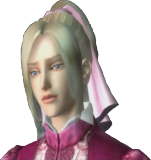
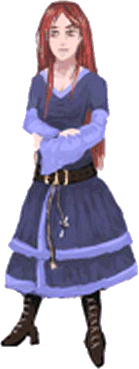
Julia
Laforeze
|
||
|
|
| Hector finds Julia in the Belijhat Mountain region, where after a meeting she opens shop. She thereafter makes regular storyline appearances as an encouraging force | ||
|
Castlevania:
Curse of Darkness
|
||
 When
Hector happened upon Julia Laforeze near a peaceful stream in the Belijhat
Mountain region, he couldn't believe his eyes: Before him stood the splitting
image of Rosaly, his recently deceased wife. It couldn't be. The image
faded as Julia approached him, ever curious about his intrepid entry. When
Hector revealed that he was searching for Isaac, his most bitter enemy, Julia
showed a vested interested, for she, too, wanted to see Isaac's villainous
reign come to an end; though, she wouldn't go as far as to specify why. Julia
knew that she could trust Hector because his enemy was hers.
When
Hector happened upon Julia Laforeze near a peaceful stream in the Belijhat
Mountain region, he couldn't believe his eyes: Before him stood the splitting
image of Rosaly, his recently deceased wife. It couldn't be. The image
faded as Julia approached him, ever curious about his intrepid entry. When
Hector revealed that he was searching for Isaac, his most bitter enemy, Julia
showed a vested interested, for she, too, wanted to see Isaac's villainous
reign come to an end; though, she wouldn't go as far as to specify why. Julia
knew that she could trust Hector because his enemy was hers.
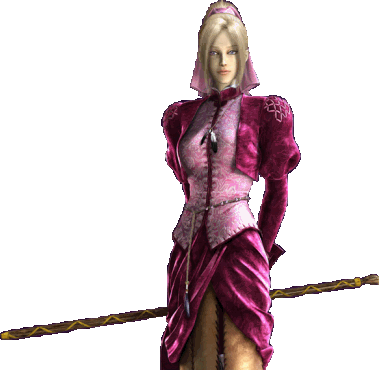
How did she know Hector's intent to be honorable? Well, what Julia did reveal was that she was a witch who could see into the future. She had escaped from the witch hunts and fled to the unassuming carvings of the great Belijhat mountains, where she could live in peace and continue her craft. To prove her loyalty to his cause, Julia invited Hector to her cabin, where she would prepare for him an elixer; furthermore, she would from this location make available for purchase weapons and armor and in addition look after and care for his stored Innocent Devils.
It was in the town of Cordova where the two devil forgemasters first clashed, in what was a test by Isaac to see how far along Hector was in terms of regaining his power. As Isaac continued to taunt the underpowered Hector, Julia's voice could be heard in appeal: "Brother--stop!" Isaac would, but not for her benefit; he had already accomplished his mission. "Let him go," the concerned Julia asked of Hector, who watched his target flee. Yet, Hector was more angry about Julia's revelation, which he mistook as a setup. She convinced him otherwise: "I stopped you because you're not yet strong enough." She reiterated her desire to see her brother stopped--that she could only live with Isaac's death if it were Hector, someone she trusted, who would deal him that fate. Hector came to his senses and realized his transgression. He apologized and bid her farewell. As he walk off, she could only be overcome by an ill feeling that bode not well.
Before the moment of truth, whence Hector would enter into Dracula's castle and face the final trial, it was Julia who showed up to offer encouragement. Dracula's curse was alive and emanating from the castle, and Trevor Belmont was surely needed, Hector thought. Julia revealed that Trevor had been felled, severely injured at her brother's hands; she saved him in time, but his participation would not be possible; it was up to Hector, she pleaded, to resist the curse, for its dark hold was not worth the price of revenge for his fallen wife. As the now-deteremined Hector entered the castle, Julia stood alone at its entrance. "Please don't die, Hector," she hoped.
When the battle between Hector and Dracula was over, Julia appeared once more to console a victorious but disenchanted Hector; she wanted to make sure he didn't "let go." She could see through his confused emotions, and she had some advice: "You must live true to your own heart." Hector realized through her words that just more than his future was at stake. With that, they prepared to exit the crumbling castle, but not before Julia could say one last good-bye to her fallen brother.
The pair watched from a safe location as the castle collapsed into the sea. Hector had doubts that the curse would be fully lifted, but Julia believed otherwise--that while the curse would not easily vanish, people were not fools--their hope lay with one another, and in time, their scars would fade and be lost to memory. "Let us have faith in the morrow," she added. They headed home to the Balijhet Mountains, where Julia was curious as to Hector's future course. He needed to find peace in a place where he could hide his many friends. Julia had the answer: He could live with her, in the secluded mountains. To live with Julia, Hector thought, was not a bad idea.
 |
|
|
||
|
Saint
Germain
|
||
|
|
| Germain greets Hector in the Garibaldi Temple and makes regular storyline appearances before acting a boss in the Machine Tower; he thereafter departs | ||
|
Castlevania:
Curse of Darkness
|
||
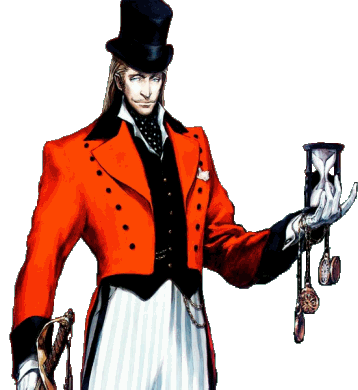 As
Hector begin to enter the Garibaldi Temple, he was stopped short by a mysterious
individual. It was Saint Germain, looking like a stranger who had dropped
in from an unknown land. "I have a request," he said to the cautious
Hector. "Stop your pursuit of Zead." Hector could only suspect him
an enemy of Zead, who had been nothing but helpful. But Germain revealed
the purpose for this request:
He was seeking to maintain the very flow of things. Hector was unimpressed;
he didn't have time for games--Isaac had to be found. Germain insisted, though,
that he knew far more than anyone could imagine; it was, after all,
his "arrangement."
As
Hector begin to enter the Garibaldi Temple, he was stopped short by a mysterious
individual. It was Saint Germain, looking like a stranger who had dropped
in from an unknown land. "I have a request," he said to the cautious
Hector. "Stop your pursuit of Zead." Hector could only suspect him
an enemy of Zead, who had been nothing but helpful. But Germain revealed
the purpose for this request:
He was seeking to maintain the very flow of things. Hector was unimpressed;
he didn't have time for games--Isaac had to be found. Germain insisted, though,
that he knew far more than anyone could imagine; it was, after all,
his "arrangement."
Hector, naturally, could not understand this request or the following chatter and told Germain to stand aside. Germain again asked him to reconsider, for the world was hanging in the balance of this very request. He wouldn't stand in Hector's way, but he trusted that the correct decision would be made. "Who was that?" Hector wondered, as he continued on despite the warning.
At a meeting near the entrance to the Mortvia Aqueduct, Hector ran into Zead, whose behavior started becoming more and more erratic; they at first conversed calmly, but Zead exited suddenly, all the while trembling and tripping over his own words. Immediately after, Germain appeared to find Hector but not his expected guest. Germain again warned that Hector should avoid Zead and his instructions, but the forgemaster didn't appreciate the advice--Isaac had to be taken down at all costs. Germain contested that his was the real mission--that he had to track down Zead, being a man not of his recollection. Hector still could not understand.
Upon entering the Forest of Jigramunet, Hector heard voices; he ducked behind a tree and spied on a nearby meeting between Germain and Zead. The subject: Zead couldn't have Germain interfering any longer, so he from his arm extended a blade and launched an attack. Germain evaded each stab by within the plane shifting in and out, cagily disappearing and reappearing at will. "I will keep returning," he promised Zead in parting. "No one escapes from me," Zead thought to himself with a wily grin. Now Hector knew for sure that these were indeed enemies.
When Hector reached the top of the Eneomaos Machine Tower, he found Germain wandering about. Though known as a master of miraculous escapes, Germain revealed that he was stuck within a time barrier placed upon the tower's top, and he wondered how Hector was able to breach it. Though, Germain could still have a physical effect, and his only inclination was to fight Hector. "Everything I need to know will be revealed," he said, as he challenged the confused Hector. In the end, Germain was brought to the point of surrender. Knowing then that fate truly was in Hector's hands, Germain promised not to interfere any longer, for he was only a traveler, half here, half elsewhere in time--not allowed to speak the truth and changing nothing. Before departing, he spoke of a feeling--a new fate for Hector. "Walk the path without fear, for you are alone," he counseled. "Give my regards to Zead."
Germain would stick around the machine tower's top a bit longer to watch on, to see Hector's mission through to a conclusion. He was caught by one of Julia's closing thoughts: "Have faith in the morrow." They were fine words, he knew, but not for him; as one who traveled through time, he saw the "morrow" differently. He decided to go far into the future to see what awaits--to witness the final battle between Dracula and the humans. Perhaps they'd remember Hector's exploits, or perhaps the battle would begin anew. He would travel through time to find his answer.
 |
|
|
||
|
The
Merchants
|
||
|
|
|
Vampire
Killer
|
 |
Castlevania
2: Simon's Quest
|
|
The
merchants are found hidden in walls or laying about multiple times
per stage |
Individual
merchants are located roaming through towns only during the daylight
hours
|
|
Castlevania:
Harmony of Dissonance
|
|
This
Scottish wanderer sets up shop
in multiple locations of both Castle A and Castle B only at certain times |
|
Similar robed figures appeared in the towns during the daytime in Simon's Quest. Their purpose, naturally, was the same: To offer Simon magical items in exchange for hearts. A typical merchant wouldn't show up again until Castlevania: Harmony of Dissonance, and this one, inexplicably, set up shop within the two castles--one regular, the other transient--when he couldn't figure out how to escape. Juste Belmont questioned his sanity, insisting that it was a poor place to open for business. Despite Juste's confused tone, the merchant stayed true to his practice and did well to sell to Juste special armor that he couldn't find elsewhere; he would also purchase from the hero gems in order to encourage more exchange. |
 These
brave yet enigmatic helping spirits gained fame by hiding within the
castle walls in Vampire Killer. When uncovered, they would assist
the brave Simon Belmont by selling him new weapons and other power-up
items for the price of a few hearts. Though stubborn in their methods,
they served well the vampire hunter in his mission to hunt down the
dreaded Count Dracula.
These
brave yet enigmatic helping spirits gained fame by hiding within the
castle walls in Vampire Killer. When uncovered, they would assist
the brave Simon Belmont by selling him new weapons and other power-up
items for the price of a few hearts. Though stubborn in their methods,
they served well the vampire hunter in his mission to hunt down the
dreaded Count Dracula.
 |
|
|
||
|
The
Ferryman
|
||
|
|
|
Castlevania
2: Simon's Quest
|
|
Dracula
X: Rondo of Blood
|
|
The
Dead River
|
Stage
2' and Stage 4'
|
|
|
Castlevania:
Symphony of the Night
|
Castlevania:
Legacy of Darkness
|
|
|
The Underground
Cavern in two separate locations
|
Stage 1: Transports
Cornell to the
ghost ship |
|
In mythology, the Ferryman, famous for his skeletal appearance, would take travelers over the River Styx for a price of one gold coin. The famous mythological figure serves a similar purpose in the Castlevania series. By stepping upon his raft, it will encourage the cagey ferryman to start rowing to an until-then inaccessible area, though not before he slips in an ominous comment like, "Sure, I'll take you to a good place. Heh!! Heh!! Heh!!" The path in which he travels is usually set; however, in certain instances, his trust must be gained in different ways. In Castlevania 2: Simon's Quest, for example, showing him Dracula's heart will persuade him to take Simon to an alternate, more important location. |
|
|
|
|
||
|
Poltergeist
King
|
||
|
|
|
Castlevania
3: Dracula's Curse
|
There are no physical appearances--his name is found only in the game's instruction manual |
The Poltergeist King is one of the least-mentioned, and even more unseen, characters in the Castlevania world. The only true mention of this character, therein, is in the instruction manual of Castlevania 3: Dracula's Curse, where we're given only vague information.
The Poltergeist King is the
one rumored to be assigned the responsibility of watching over the Vampire
Killer whip and the mystic sub-weapons. While, generally, it's the Belmont
elders' job to house and protect the ancient weaponry, the Poltergeist King
is presented as the overall guardian of the weapons' power. Regardless of
his relative obscurity, the Poltergeist King was almost assuredly the one
who supplied Trevor Belmont with the weapons when it was time for his encounter
with the Dark Lord. We could assume that the Poltergeist King, rather than
an elder, was entrusted with the weapons by Sonia Belmont after her adventures.
 |
|
|
||
|
Soleiyu
Belmont
|
||
|
|
|
Castlevania
2: Belmont's Revenge
|
The possessed Soleiyu is waiting at the end of Stage 6, the chapel, for his father to arrive |
On his twenty-first birthday, on the eve of a ceremony whence his father, Christopher Belmont, would hand down to him the whip and the sub-weapons, Soleiyu Belmont's life took a demonic turn. It was believed that Dracula will killed by Christopher sixteen years earlier, but the Count had pulled the wool over everyone's eyes with a cunning escape before his perceived defeat.
Though still heavily depleted of his energy, Dracula lay in wait for the longest time. On the night before the ceremony, he used what remained of his dark power to magically possess Soleiyu and coerce him to the side of evil. His intent was to use the Belmont's power, in deference to his own ailing power, to raise Castlevania from the depths, and, eventually, instigate a father-versus-son battle to eliminate both as a threat.
Father and son battled atop the tower, and the aging Christopher's fighting spirit allowed him to beat some sense into Soleiyu and remove from his soul the Count's possession. The lineage was thus protected, and after the real defeat of Dracula moments later, Soleiyu indeed took his place in line as the next vampire hunter.
  |
|
|
||
|
Zoe
and Dolores Belmont
|
||
|
|
| The sisters appear only in storyline sequences, including the an early meeting, after boss defeats, and upon the final battle's completion | ||
|
Castlevania:
Order of Shadows
|
||
|
In the trio's bid to discover the link between The Order and the forces of Count Dracula, it was the sisters who handled most the investigation of the villain's mansion while Desmond took to clearing the area in search of the Sacrificial Altar, where Rohan Krause was in the final stage of preparation for Dracula's resurrection. It was they who uncovered an enchanted gauntlet, which according to family confidant Giovanni was an alchemy-based artifact tied to the Belmonts' history, and rushed it over to Desmond, who could then use its magical properties to harness deadly spells. They also deciphered the castle's interconnected nature, which for allowed Desmond to locate the Inner Sanctum, a separate entity where the altar, and more importantly Krause, was located. Zoe was the more talkative of the two sisters and kept more closely in touch with Desmond during his campaign. It was she who checked on him after his first boss encounter; she also brought him the gauntlet and relayed to him the sisters' discoveries. Dolores, the youngest of the trio and the most business-minded, preferred to remain hard at work scouring the castle in search of clues; Dolores was said to be equally as capable of wielding the Vampire Killer but was not yet of age. Though they soon after Krause's defeat left the sanctum to head back to the mansion to investigate further (more so to leave the confrontation with Krause in Desmond's capable hands), they turned back just in case. Their fears unfounded--Krause and then even Dracula having been defeated--they arrived in time to witness Desmond's finishing off the Dark Lord with a mighty whip-slash. Their only concern was the safety of their brother, and of that they were assured. Standing together, as they always had, the three escaped the castle and headed home. |
 Zoe
and Dolores are the sisters of Desmond Belmont and vampire hunters all
the same. As was their brother, they, too, were victim of their parents'
murder at the hands of Rohan Krause and were left to fend for themselves.
Without much in the way of guidance, the three
grew together with the closest of bonds, unaware of their parents' true
murderer (the elders kept from them Krause's true identity in the hope
that anger would play no role in their development and potentially outweigh
their sense of justice).
Zoe
and Dolores are the sisters of Desmond Belmont and vampire hunters all
the same. As was their brother, they, too, were victim of their parents'
murder at the hands of Rohan Krause and were left to fend for themselves.
Without much in the way of guidance, the three
grew together with the closest of bonds, unaware of their parents' true
murderer (the elders kept from them Krause's true identity in the hope
that anger would play no role in their development and potentially outweigh
their sense of justice).
 |
|
|
||
|
Lydie
Erlanger
|
||
|
|
|
Castlevania:
Harmony of Dissonance
|
Juste rescues Lydie in the castle keep of Castle B; he saves her again later on in the heart of the castle |
 Lydie
Erlanger was the childhood friend of Juste Belmont and Maxim Kischine. During
the two heroes' years of strict physical training, her presence was always
both comforting and invaluable to them. Lydie, really, meant everything to
them.
Lydie
Erlanger was the childhood friend of Juste Belmont and Maxim Kischine. During
the two heroes' years of strict physical training, her presence was always
both comforting and invaluable to them. Lydie, really, meant everything to
them.
After the falling out between Maxim and Juste, whence Maxim found himself under the possession of the Dark Lord's spirit, she became a pawn in the battle between good and evil. Because he could not suppress the possession, Maxim kidnapped Lydie and brought her to Castlevania, where she would surely be served up to the dark forces as the key to the resurrection of Dracula.
Lydie awoke from an unconscious state only to find herself stashed away in the second of two castles, for reasons she wasn't aware. She remained there until Juste finally located her. At this point, though, Death, who had also been scouring the castle trying to locate her by the whole time trailing the young Belmont, grabbed her in his skeletal arms and took her away.
She was taken to the heart
of the second, transient castle where the possessed Maxim would finish the
ritual by offering her up as a sacrifice. Juste, who had located Dracula's
remains and thus used them to break the seal leading to the castle center,
showed up in the nick of time, and he beat some sense into Maxim to the point
where a fleeting Dracula had no choice but to escape or risk being vanquished
prematurely. Lydie was now safe, and she escaped the castle with the now-sane
Maxim. On behest of Juste, Maxim
never told Lydie about the kidnapping or the proceeding events.
|
[Home] [What's New?] [CV Library] [Stages] [Reviews] [Weapons] [Castleography] [Multimedia] [Codes] [Links] |
||||