
![]() The Bloody Road, cont.
The Bloody Road, cont. ![]()

![]()
|
Castle
Map
|
|
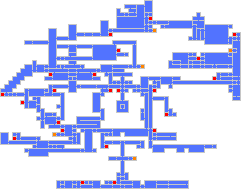 |
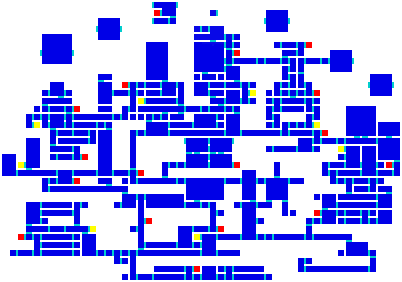
Castle Entrance; Reference Letter: A, N - This nonlinear castle contains a shortened entrance and the typical hall construction--sans all of the platforms and stairways you'd usually find within. This area stretches upward to what would what would have been Medusa's stage in Castlevania.
Alchemy Lab; Reference Letter: B - The lab is much more detailed in its design and length this time, with more traps, both spiky and chemical. Since the map atop the page was made with this game in mind, you can see the relationship between this area and Medusa's stage of the first game and its link to the chapel.
Marble Gallery; Reference Letter: X - The gallery can be reached through the lab's alternate exit, which would cut right through the combination of the lower ceremonial room (big clock room and what's below it) and higher chapel's last leg. It's so large that it entails several areas, including the castle center and most of the dungeon.
Outer Wall; Reference Letter: V - The marble gallery stretches so far that it leads to the farthest portion of the castle's right half. That's here, in the start of the outer wall within one of the castle's highest towers.
Long Library; Reference Letter: O - Unlike in Super Castlevania IV, only through that tower can you reach here, the home of the Master Librarian and the main information source of the castle. What would ordinarily exit into the dungeon below instead has no other exit.
Clock Tower; Reference Letter: K, J - The top of that same tower leads out to what will be a familiar area to those who have seen the final level of Castlevania or the second-to-last stage of Rondo of Blood (see "Other Similarities" at page's bottom). It's the long bridge, some of it collapsing, that leads into the two-plus towers that comprise the giant clock; the big pendulums lead into the final hall that connects to the keep.
Underground Cavern; Reference Letter: F - This is an F somewhere near the center of the castle. The initial caves have never been traveled through before, but they lead to the stalagmite-filled caverns that partly made up Frankenstein's stage in Castlevania.
Royal Chapel; Reference Letter: D - The chapel is entered into from the left wing of the alchemy lab or the underpass of the castle keep. Simply put: This stretch of area, encapsulating the lookout tower and the ruins (which would be outside the chapel walls), is the highest point of the castle's left half. The only things missing are the mummies.
Castle Keep; Reference Letter: L - This ominous keep splinters outward from the giant clock tower. The stairway's middle portion is gone, having rotted away in the four years since Richter's visit, so the keep, itself, is at first inaccessible. If we enter from the west, we find that the keep has been expanded to include some lower corridors, all of which spill into the keep's dilapidated underside, which we rarely get to see.
Olrox's Quarters; Reference Letter: G - Olrox's quarters are a series of tunnels that branch out from the castle's lower ruins--that of which has been cleaned up and residentialized by Olrox and his minions. The buildings that have gone up make up the "Villa," as seen in Castlevania 64, and they help separate the castle's two halves. On a final note: One of the bottom caves that branch out from this area is the final tunnel that leads to Frankenstein in stage 4 of Castlevania.
The Colosseum; Reference Letter: Z - Though its outer regions encompass the leftmost portion of the castle's left half, its large perimeter stretches behind the the alchemy lab and all the way to the castle center.
Abandoned Mine; Reference Letter: F - This F would be somewhere between and under T (the garden) and U (the courtyard). These caves would be comparable to those found on the second stage of Akumajou Dracula X68000--though much shorter.
The Catacombs; Reference Letter: F - Locate the lowest Fs possible to find this area. Before Richter, no Belmont had ever traveled this far underneath the castle. This area's addition is anything but recent, and only Galamoth's presence could make it necessary to travel.
![]()
![]()
|
Castle
Map
|
|
 |
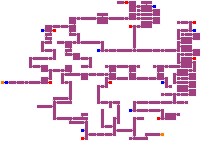
Stage 2: The Castle Halls; Reference Letter: A - Not yet had the worn-out curtains and the familiar castle structures come to pass, since we're so early in the castle's history. In fact, Legends' halls are longer and more encompassing--including, at the time, their own library. As you can see on the map (from the second dot on), this stage stretches all the way to the castle's right half.
Stage 3: The Clock Tower; Reference Letter: K - And those halls slowly inch upward until you reach the clock tower--a rather unconventional method of reaching this area. Since the tower starts lower than normal, it's a long, long climb for Sonia to reach its top.
Stage 4: Castle Keep; Reference Letter: L - The initial part of the keep could be construed as the sword lord-inhabited areas of Rondo and Symphony (see "Other Similarities" at page's bottom). And it leads, stairlessly, to Dracula's throne room. Dracula isn't here, however, but Alucard is waiting instead.
Stage 5: The Inner Den; Reference Letter: F, W - From the keep, you'll drop down through E (the Abyss) and into the F regions--most likely the same catacombs that lead to Frankenstein in Castlevania. These catacombs don't exit into any ruins, however; instead, they lead into the base of the inner den, the castle's last line of defense. It's in this area that Dracula preferred to roost in his early days as a vampire.
Bonus Stage: The Dungeon; Reference Letter: H - The dungeon can only be reached secretly through the midway point of stage 5. The dungeon rests atop the den, and its tail-end has an exit that leads right back into the upper portion of that den. Either way, all paths lead to Dracula.
![]()
![]()
|
Land
Map
|
Castle
Map
|
|
No Map Available
|
No Map Available
|
Stage 2: Castle Wall; Reference Letter: A, S - After entering through the Forest of Silence, the castle halls await. However, Castlevania 64 proceeds by utilizing two towers that surround these halls. After opening the gate that blocks the path, you'll exit into areas T and U, the garden and graveyard (as in Rondo for the Lypuston battle), instead of proceeding up into a lab.
Stage 3: The Villa; Reference Letter: R - From those outside areas, the graveyard especially, it's easy to loop around to G and into the former ruins that now house the Villa. From a shed inside the Villa's hedge maze, you'll drop down a secret passage to continue the journey.
Stage 4: Underground Mine; Reference Letter: F - You drop down into one of the center Fs, the former abandoned mine, where a lift system, assembly line and rock crusher can now be found. This mine now acts as means for sneaking into the castle center.
Stage 4b: Underground Tunnel; Reference Letter: F - Carrie uses the coffin from stage 3 to enter into the underground tunnel system, as seen in Circle of the Moon. Regardless: Both of these underground areas exit into the castle center.
Stage 5: Castle Center; Reference Letter: R - The center is a whole chunk of the castle, and it's not confined to one area. This alternate castle entrance contains the leftmost colosseum (where the Demon Bull is located), the upper library and part of the dungeon. Several other halls line its top.
Stage 6: The Duel Tower; Reference Letter: S - From the upper regions of the center, Reinhardt takes a lift into the rightmost area of the castle's right half (mainly the towers, two of which he'll venture through). This is the first tower he climbs, and it's no doubt connected to the Battle Arena from Circle of the Moon.
Stage 6b: Tower of Science; Reference Letter: S - Carrie goes to the opposite direction--to the leftmost area of the castle's left half. Two separate towers await, the first of which is nothing more than the castle's familiar alchemy lab.
Stage 7: Tower of Execution; Reference Letter: S, H - For Reinhardt--keeping on the conventional Belmont path--the rest of the dungeon (H) spills into this tower, the second of which he'll travel through.
Stage 7b: Tower of Sorcery; Reference Letter: S, D - Carrie's second tower runs through and has elements of the encompassed royal chapel. For Carrie, there's no better means for adventure than through a supernatural place of worship.
Stage 8: Clock Tower; Reference Letter: K - Both the Tower of Execution and Tower of Sorcery lead to the clock tower. (Carrie probably travels through the armory and cuts underneath the castle keep to get here.) Though in 3D, the tower sticks to its chamber-by-chamber construction. And it levels off into a clock room similar to that seen in Symphony.
Stage 9: The Castle Keep; Reference Letter: L - That clock room leads directly out onto the familiar staircase that'll take you into Dracula's throne room. Two rooms have been embedded onto the longer-than-usual staircase, but who knows how they got there?
![]()
![]()
|
Land
Map
|
Castle
Map
|
|
No Map Available
|
No Map Available
|
Stage 3: Castle Wall; Reference Letter: A, S - As in Castlevania 64, it's through the Forest of Silence and into the compressed castle halls. Cornell's order of tower entry differs from the others, but it all leads to the same place.
Stage 4: The Villa; Reference Letter: R - Once through the gate, it's into the graveyard/garden area around the midway point of the castle's lower regions. The larger hedge maze makes for a greater distance between the escape point (the shed) of this stage.
Stage 5: Outer Wall; Reference Letter: V - Instead of using the coffin to drop down to the depths of the castle--as Reinhardt and Carrie would later do--Cornell sneaks outside, around the castle's outer wall. From the base of the wall, he uses the ledges and platforms to scale the bricks and reach the roof.
Stage 6: Tower of Art; Reference Letter: S - From the roof, Cornell takes a lift downward into one the castle's highest rightmost towers--this most likely the treasury from Super Castlevania 64.
Stage 7: Tower of Ruins; Reference Letter: S - From atop the tower of art, Cornell slips into one of the castle's backmost towers; these ruins, insofar, take him all the way over to the outside areas of D (the chapel).
Stage 8: Tower of Science; Reference Letter: S - Cornell chooses to take the long path around by entering into one of the castle's leftmost towers from the end of stage 7. This time around, the lab is more production-based, and its security has been turned up twofold.
Stage 9: Duel Tower; Reference Letter: S - The tower part of this stage comes on late, as the initial areas would more encompass letters P and M; this takes you to a tower up near the middle areas of the castle.
Stage 10: Tower of Execution; Reference Letter: S, H - Cornell loves these towers, and he travels through this dungeon-like trial in hopes of finding the traditional path to Dracula.
Stage 11: Tower of Sorcery; Reference Letter: S, D - Now Cornell is just all over the place, as his erratic path through the castle continues. From the tower of execution, Cornell skips all the way back to the castle's right half and to the chapel area. Why? Who knows?
Stage 12: Clock Tower; Reference Letter: K - From atop the chapel regions, Cornell finds a way into the lower chambers of the castle's huge clock tower. In order to proceed, Cornell must go outside the tower--around to where Simon fought Akmodan in Super Castlevania IV--in order to take a lift upward.
Stage 13: Castle Keep; Reference Letter: L - Cornell finally reaches the clock room before battling Ortega directly atop its roof. After Ortega's defeat, he retreats back down and out toward the familiar staircase. Dracula is three rooms away.
![]()
![]()
|
Castle
Map
|
|
 |
The Catacomb; Reference Letter: F - Upon entering into the castle and reaching the ceremonial room, the heroes fall through E (the abyss)--the long pit the Belmonts can't seem to avoid--and into the catacombs reminiscent of those from stage 4 of Castlevania. The catacomb itself stretches a long way around and exits into the courtyard for the boss battle; like everything in this game, the courtyard is out of place.
Abyss Stairway; Reference Letter: S - The abyss stairway seems to be the base of that short tower just above B (the lab). This is reminiscent of the upper portion of the underground caverns from Symphony--where the spear guards tormented you. This area is your only escape from the catacombs.
Audience Room; Reference Letter: X - The audience room, a marble gallery of sorts, is a huge chunk of the castle. As the central focus of this castle's incarnation, it has exits to most every other area of the game.
Machine Tower; Reference Letter: S - This S is somewhere above the chapel. I guess that it could be the clock tower otherwise located at K, but it's too far to the left. It doesn't exit into the castle keep, so I'd consider it a separate entity--perhaps just a lower production tower.
Eternal Corridor; Reference Letter: G - The eternal corridor is right of the audience room, and its position on the Circle of the Moon map leads me to believe (as best I can match) that it's one in the same with the tunnels that previously made up Olrox's Quarters. After all, there are "Frankens" about.
Chapel Tower; Reference Letter: D, S - The chapel is more to the right in this game than is normally placed, and it stretches over a great length, both upward and around. True to being a "tower," it's a long journey upward through a couple of stain-windowed corridors to escape into the upper regions of the castle.
Underground Gallery; Reference Letter: F - None of the "underground" areas of this game are really that far, well, underground, adding to the enigmatic nature of this game. The underground gallery is built to act a refuge, which would make it closer to being around and patterned after letter W, the inner den.
Underground Warehouse; Reference Letter: F - One F on the castle's left side is a little higher than the rest, and that would be for this area. The underground warehouse intrudes partly on what is normally the alchemy lab, but it does wind up extending downward into the upmost depths of the castle.
Underground Waterway; Reference Letter: F - As one of the Fs near the castle's right half, these are the same tunnels that Carrie traveled through in Castlevania 64.
Outer Wall; Reference Letter: P - This part of the outer wall stands tall all the way in the back of the castle. As Cornell used it in Legacy of Darkness, its path leads you to the roof-like structures that rest below the castle keep.
Triumph Hallway; Reference Letter: A, N - The halls of the castle are hardly an area, as nothing of importance rests within. You can't escape the castle, but you can make it to the Symphony-like entrance.
Battle Arena; Reference Letter: O, S - Right above where the library would normally be is the battle arena, an enclosed and unimportant area of the castle. I include an S in its reference since its origin is directly related to the duel tower in the N64 games (the Konami team who made those games also made this).
Observation Tower; Reference Letter: P, S - From the outer wall, you can work your way up to here. This area is one of the towers above D, and it connects to the armory as an alternate entrance into the castle keep--an area that is also incorporated into this one. Like in Legends, a friend will be waiting in the stairless keep instead of Dracula.
Ceremonial Room; Reference Letter: M - The ceremonial room is the smallest area within the castle, and it secretly holds another throne room (as seen in Simon's Quest) which acts a secondary command post for a castle ruler in peril; it would serve its purpose here.
![]()
|
Castle
Map
|
|
 |
Castle Entrance; Reference Letter: A, N - Juste starts at the more traditional entrance into the castle. He parts with Maxim at the beginning of point N and is chased the rest of the way, through the woods, over a drawbridge and into the entrance with its initial main halls, which are now nothing more than two window-filled vertical rooms.
Marble Corridor; Reference Letter: X - From an out-of-the-ordinary vertical passage from the main halls, Juste can immediately enter into the marble area of the castle--an area now less showy and more cold and confining than in its last two incarnations.
Room of Illusion; Reference Letter: X - This area is an extension of the Marble Corridor, entered into by dropping down from one of the corridor's large stair-filled rooms. The transient and real versions of this marble section will prove to be more decoratory and mystical.
The Wailing Way; Reference Letter: U - From another of the Marble Corridor's large stair-filled rooms--and later from the Entrance, as in Rondo--you can get to this barren courtyard area which precedes the graveyard.
Shrine of the Apostates; Reference Letter: U - This is the extension of the Wailing Way, once you get past the graveyard, below which the forces of evil have built a more sacred resting place. This shrine is the beacon that things are about to get hairy--its transporter room represents the only way to escape from these early areas.
Castle Treasury; Reference Letter: R - That transporter leads here, the castle center that encompasses the heart of the castle. Like Circle of the Moon's Audience Room and N64 games' Castle Center, this area--home to Dracula's supply of wealth, misty pathways, sealed battle room (from Symphony) and other secrets--exists solely for its branching entranceways into most other castle areas.
Cave of Skeletons; Reference Letter: F - One such branching entrance leads here, the bizarre skeleton cave--it seems as though Dracula has rewarded his undead forces by affording them the rights to a whole castle area in which to build upon. On its own, it's a simple underground area that rests beneath the castle entrance, around where Circle's warehouse is located, to which you can eventually escape.
Castle Top Floor; Reference Letter: L, P - This, too, is an extension area--the top point of the Treasury. Its lower portion is the armory, an elevator-filled area where most of the stronger enemies hang around. When you reach the top, after hitting a switch elsewhere, you can enter into the Dracula-less castle keep, with long stairway intact.
Luminous Cavern; Reference Letter: F - This other branching area of the Treasury is akin to Symphony's Underground Caverns and Castlevania's Frankenstein area. These gloomy caverns are the means to enter into the Clock Tower.
Sky Walkway; Reference Letter: S - This is one of the rightmost towers, an especially guarded area located around where "I" is on the map. You can tell that it's high up because of the intimidating clouds surrounding its top portions. Mainly, it allows access into the Chapel and, otherwise, the Aqueduct.
Chapel of Dissonance; Reference Letter: D, S - The Chapel has slowly worked its way over to the castle's right side after Simon's adventures. This place of evil worship combines its Circle of the Moon location with Symphony's design to create quick access to the castle top floor and its keep.
Aqueduct of Dragons; Reference Letter: F - From the Chapel's outer grounds, you can pass through a hall of mirrors, which you'll remember from Akumajou Dracula X68000, to reach here. The castle's tunnel system and water supply continue to mimic that of Circle's and the N64 games. These tunnels will also lead you back to the Luminous Cavern.
Clock Tower; Reference Letter: K - The tower, entered into from a cavern portal or Sky Walkway, is in its rightful location; the gear-filled tower with several similar-looking vertical chambers and its clock room, found in the N64 games and in Symphony, is again a maze of steel. However, it doesn't exit onto a long bridge or into the keep--instead, it leads right back to the Walkway.
![]()
|
Castle
Map
|
|
 |
Castle Corridor; Reference Letter: N, A, R, X - The immediate entrance to the halls, residing over the entrance from the eclipse rather than the forest, has developed into a full-on lookout tower, which Soma can climb later. Both main halls themselves are hardly that--the interiors are destroyed, leaving no platforms, stairways or curtains; the walls have collapsed, leaving just pillars to hold up the ceiling. So only the outer regions of the castle are visible. Between the two halls is a small fishman-inhabited fountain area rather than an underground pool of water. The corridor extends well through the middle of the castle, taking up what would normally be the marble gallery and other castle-center areas; as such, it connects to several areas of the castle, starting with the following.
The Chapel; Reference Letter: S - The chapel is more or less a tower on the far right side of the castle, compared mostly to Circle of the Moon's and Harmony's chapels, which had also been moved to this side rather than being placed above the torture lab. Soma will make his way straight down through this tower-like area and travel into a close-to-normally-placed one.
The Study; Reference Letter: O - The castle's long library, or the Study in this instance, is lined with bookcases and perhaps the missing galleries' many sculptures. It's similar in structure to Symphony's library but even more so to Super Castlevania IV's in how it unfolds and to where it leads (an underground area covered later). Soma will only search around here before heading way back to the castle's left side.
Dance Hall; Reference Letter: Y - Soma travels to the Dance Hall, which seems to cut off part of the colosseum. Not much would have to change--just keep the ballpark-like structure, remove the weapon exhibits, polish it up with some woodwork, and you've got another form of entertainment for your Dark Lord. Soma wants to grab a few items, backtrack out of here and into the corridor.
Inner Quarters; Reference Letter: P - From the halls, he can now make it here, the Inner Quarters that are a substitute for the armory. He'll run into much resistance here, as you'd guess. I'd compare this most to the last stage of the X68000 game, which had the vampire maids (persephones, in this case) and a similar decor. However, from here, Soma can't reach the close-by keep quite yet.
Floating Garden; Reference Letter: T, S - The garden usually resides around the outside of the second main hall, but it's not hard to imagine that it could stretch out this far to mid-castle. This area is more an anomaly, with entrances that whimsically transport you around the castle, most likely to the tiptops of the many castle towers.
Clock Tower; Reference Letter: K - From one of those tower tops, Soma can reach the normally-placed clock tower. This is perhaps the most gear- and trap-filled it's ever been, but it's all the same, and you will eventually be able to reach the keep from here. For now, Soma has other places to go.
Underground Reservoir; Reference Letter: F - This area would cover most of the F's shown on the main map atop this page, the whole of which closely resembles the lower portion of Symphony's underground cavern. Soma wants to get to the bottom of this area.
Underground Cemetery; Reference Letter: F - It's another Symphony-like area (no surprise at this point). This is practically a shortened version of that game's catacombs, where you fought Galamoth. This game's dark worship area houses a pack of similar lesser enemies with boss. From here, Soma can gain quick access to the next area.
The Arena; Reference Letter: Z - The colosseum hasn't changed much from Symphony (again), but it combines elements from Circle of the Moon's Battle Arena. The difference is that it's more an underground area instead of being featured above the main halls or as part of the castle center.
Forbidden Area; Reference Letter: F - This small underground area is more an extension of the Reservoir, a place that Soma doesn't necessarily need to traverse. If he does, he'll find a pirate ship, which may signal that the hidden docks from Rondo are not far away.
Top Floor; Reference Letter: L, R - Instead, Soma wants to be here, an area that Juste Belmont (Harmony) knew by the same name. It encompasses some of the surrounding chambers of that game's Treasury, too. Soma is more interested in making it to the castle keep--long stairway, boss and all--which rests atop all of this madness.
![]()
![]()
|
Castle
Map
|
|
 |
Lost Village; Reference Letter: N - Though only a replica of Dracula's haunted abode, the cult's symbolic hideaway is very much situated in the forest and in proximity to an abandoned village (as Dracula's castle was in Simon's Quest). As it's the dead of winter, the continuing snowfall has covered the landscape in a white sheet, making for a not-quite-as-dark setting as warm-up for our castle-breach.
Wizardry Lab; Reference Letter: B - Soma sneaks into the castle via a secret entrance made accessible by the draining of the castle's moat and finds himself in the lab, whose starting point is placed somewhat lower than normal but in the general vicinity (the lack of a main hall somewhat masks this precedent); however, this lab takes us down and around the following area.
Garden of Madness; Reference Letter: T, R- The garden's left entrance is right about where the main hall would exit into the courtyard. The flowery domain is large in size, encompassing much of the map's center, and shadowed only by the oppressive background structure--the castle wall that stands between Soma and what would have been an alternate path to the castle's left side (through the Marble Gallery or the Castle Center, if theory holds up).
Dark Chapel; Reference Letter: D, S - The later titles see the chapel's continuing shift to the castle's right side. There are no surprises here, as Soma will traverse bell towers, gaze upon stain-glass windows, and eventually locate storyline-continuing and accessibility-move-giving bosses. However, since the following area is for now blocked off, Soma will head back through the garden and to the castle's left side.
Demon Guest House; Reference Letter: C, S - The chaos-serving dark forces have tidied up the former castle ruins, creating a high-class boardinghouse with a carnival-like atmosphere. Conspicuous is the three-level tower on its left side and the open, narrow corridors that line its top, reminding one more of the chapel that used to be present here. Once he reaches the top of the area and procures another accessibility item, he can again head through the garden and past a barrier.
Condemned Tower; Reference Letter: V, S - The condemned tower, which in terms of location matches Symphony's Outer Wall, is all used up and ready to be leveled. It served its ever-changing purpose well, having possibly been Castlevania: Dracula X's reservoir, a treasury, or maybe a tower of dolls. It'll be climbed one last time in order to reach a familiar area.
Cursed Clock Tower; Reference Letter: K - Most consistent is the clock tower, which is exactly where it should be. Gears, cogs, pendulums, and other dangers will be no deterrent to Soma, who wants to get to the tower's top to take out a troublemaker. Since the leftmost exit is for now inaccessible, Soma backtracks to the chapel and as far down as possible.
Subterranean Hell; Reference Letter: F - It's down into the castle's vast underground, a dark, dank set of caverns filled with pools, waterfalls, and deadly sea life. This long-spanning "hell" is a typical underground area but seemingly a conglomerate of watery areas as explored in earlier games like Castlevania, Symphony and Circle of the Moon.
Silenced Ruins; Reference Letter: I - The Silenced Ruins is a spitting image of the famous main hall, a remodeled classic in place of the designated storage facility. Is it the cult's tribute to the original castle model? A tired, overused area sent to storage to retire and die? Or is this castle somehow reversed (with only the chapel-placement as proof)? The existence of a familiar main-hall boss is Soma's only focus.
The Pinnacle; Reference Letter: P, L - Having earned a bat-like power, Soma can finally reach the castle heights, through either the clock tower of the guest house. The area's large underside is your usual armory-type area (a trend started in Akumajou Dracula X68000) and of course leads up into the familiar, static castle keep.
Mine of Judgement; Reference Letter: F - After Julius clears a barrier, Soma can enter the mine, which on paper looks like an extension of the Condemned Tower. It in comparison to past titles has no real congruence--just another typical "underground mine" area--but for better reference would be the meeting point between whatever lurks beneath Symphony's Outer Wall and to the right of its Underground Cavern.
![]()

|
Castle
Map
|
|
|
Coming soon.
|
Abandoned Castle; Reference Letter: A, C, F, H, P, L, Q - While it would appear that the Abandoned Castle is just a random haunt, recognizable elements raise the possibility that this was a "past Castlevania," a used-up manor that like Bloodline's castle survived in some form. Hector takes a unique but somewhat natural path through it; he enters directly into its main halls (zombies, red carpets and familiar-looking windows with curtains), heads upward, and exits into the castle ruins, where he circles the tower balconies. After finding what he needs, he heads back to the main halls and down into its flooded basement where the expected mermen lurk. He follows this path down into the castle's catacombs and makes the long trek across the entirety of its cavernous depths before emerging into the dungeon. He climbs up to what can only be considered an armory (a "Top Floor"-type area flooded with armored habitants) and finally arrives at the castle keep. After defeating a boss, he uses a convenient "escape pod" to lower himself way down to the castle's back exit, the base of the mountain range. (All references suggested by TMS.)
Dracula's Castle; Reference Letter: A-Z - As per Curse of Darkness' compacted nature, this version of Dracula's castle is one big all-encompassing "area." That is, Hector will run through the entire estate in a largely straightforward path en route to the Castle Keep and Dracula's throne room. Hector will through this path traverse both outer regions (balconies, porches and lookout points) and castle innards, with no decor looking all that familiar, no intent by the game's designers to make it so, and thus no reference letters appropriately mapping said route. In reality, the generic-looking haunt is home mainly to one same-style roomset (a chamber of battle followed by a long-distance connector hall) after another. So while all reference letters A-Z are understood to be entailed, only the Castle Keep is typical of the series.
![]()

|
Castle
Map
|
|
 |
Entrance; Reference Letter: N, A, T, Z- Portrait's more condensed map (as the result of the focus on "portraits") tends to lump together multiple areas as one. This is true of its entrance, whose starting point is the forest, which then leads into main halls (the second branch of which is the pillar room as destroyed by the Behemoth, an arena-looking place that we can argue entails, also, the bottom of the Colosseum, says contributor Kev, since the Behemoth usually roams here), and then continuing upward what used to be the bottom portion of the torture lab (all of Castlevania's second stage before the spike pistons).
Buried Chamber; Reference Letter: F, H - Due to an obstruction placed at the entrance's top, Jonathan and Charlotte will have to retreat down and right into the Buried Chamber, which is an underground area encompassing Harmony's reservoir and also the castle's seemingly misplaced dungeon. However, we can argue that precedence for this exists in the form of Castlevania: Dracula X's catacombs--simply an underground area with "holding cells."
Great Stairway; Reference Letter: D, X, I - After a series of portrait-related events, the pair will gain access to the Great Stairway--another mishmash of recurring areas. Our starting point is the chapel (Symphony- and Harmony-style) followed by a long corridor resembling one from the former Marble Gallery; the top of the area is littered with windows that peer out to the tower walls and gargoyle statues--the Castle Ruins, through which many a Belmont hero have trekked. The path curves downward into a chamber of riches--a storage facility stocked with gold.
Tower of Death; Reference Letter: K - Directly north of the stairway's portrait room is the Tower of Death, which contrary to previous entries is a simply defined area--it's your basic Castlevania clock tower, gears, cogs, Medusa heads, crumbling bricks, and all. Like it did in Dawn of Sorrow, its middle-left side exits into an expected place.
Master's Keep; Reference Letter: P - Like the Pinnacle, the Top Floor, and others similarly named, the Master's Keep has as its large underside an armory-type area--filled to the brim with heavily armored foes and thus the perfect support for Dracula's favorite lurking place.
Throne Room; Reference Letter: L - It's the classic castle keep--a long stairway, a clock-tower view, a short rest area, and then the throne room, where Dracula awaits. The added dimensions (the space above the stairway and the secret room, which was also present in Rondo and Symphony) keep with the natural evolution.
![]()
![]()
|
Land
Map
|
Castle
Map
|
 |
 |
Castle Entrance; Reference Letter: N, A - Shanoa exits the forest and then passes through two gates before entering the castle. The first room has a Symphony-style "main hall" look, but the rest of the decor is atypical--a series of zigzagging rooms whose wavy platforms are the main visual. These indistinguishable rooms, stacked one upon another, displace both the castle ruins and the chapel.
Library; Reference Letter: O - Even when considering the condensed nature of Ecclesia's map, the placement of the library on the castle's left side doesn't make sense. We'll call it an anomaly. Nevertheless, Shanoa passes through the library in order to gain an accessibility maneuver and then retreats back to the entrance.
Underground Labyrinth; Reference Letter: E, F, - She can now pass through a certain wall and descend into the Labyrinth, whose vertical chambers, looking past the foreground platforms, form the abyss (through which Simon Belmont and Nathan Graves fell). Otherwise, this is merely your derivative "underground" area, another Symphony-inspired abandoned mine-catacomb composite. As Nathan did, Shanoa will arc around and climb up to the next area.
Barracks; Reference Letter: U, R - She arrives as the Barracks, a set of buildings that comprise the castle center (as seen in Symphony and Castlevania 64) and former outer ruins. Shanoa passes in and out of the buildings, through the courtyard, and breaches the clock tower.
Mechanical Tower; Reference Letter: K, V - This is the extra-long version of the classic clock tower. The long climb entails the expected dangers/visuals--gears, clocks, spike-lined surfaces, Medusa heads, and a battle with the Grim Reaper. With victory in hand but still short of Cerberus heads, Shanoa will drop down to check out the castle's lower-right side.
Arms Depot; Reference Letter: W, P - The Arms Depot is mainly an armory (which would place it lower than normal) but also the castle's inner den, which you'll remember from Castlevania: Dracula X. Since the area is ultimately a dead end, she'll get what she needs, turn back, and head for the homestretch.
Forsaken Cloister; Reference Letter: D, P- The T-shaped cloister displaces the armory and at first glance seems to have no predecessor. Though (as Shlomi CC notices), its corridors match the connecting areas of Symphony's Royal Chapel. In this case, the chapel isn't a portal to heaven; with three Cerberus glyphs collected, Shanoa can break a seal and instead enter "Hell."
Final Approach; Reference Letter: L, X - The Final Approach is another name for the pinnacles and top floors you've already seen. Though, from its Vampire Killer-reminiscent displays, it seems to encompass part of the gallery. Otherwise, the Final Approach is home to the castle keep--a more tattered, misty version but still the Dark Lord's favorite battleground.
![]()
![]()
|
Castle
Map
|
|
 |
Stage 1: Castle Entrance; Reference Letter: N - Chris' adventure begins at the castle's forest-flanked, gated-in entrance, which like all of Rebirth's castle areas is expanded and multi-routed. The lower path, notably, includes a bridge that may be the one that provided us castle access in Simon's Quest (this time, though, it's way more populated). The higher path features more-developed structures--mostly series of multi-leveled viaducts. Both paths curve around and converge at the gatekeeper's domain.
Stage 2: Inner Halls - Caverns; Reference Letter: A, F - Having now accessed the castle, we find that its greatly expanded opening portion merges together series of traditionally presented main-hall passages (two of which encompass sections of the previously traveled entrance) and the subterranean areas we recall from Castlevania's fourth stage and Symphony of the Night's Underground Cavern--those we usually traverse later on in the adventure. All available paths arc upward and deliver us to a typically-arch-windowed boss room.
Stage 3: Torture Lab; Reference Letter: B, C - The main hall leads up and into the expected place: the alchemy/torture lab, whose scale and structuring is most similar to Symphony of the Night's. Its first section its aesthetically neutral yet speaks of dangers ahead with its stabbing protrusions and depictions of skeletal victims; it loops around to the east and ushers you into the next section, the upper ruins' bridges serving as the connector between the two. The stage's eastern half is rougher in appearance and turns up the gore factor; it introduces what is standard: bloodstained surfaces and the usual slicing and crushing devices.
Stage 4: The Chapel Tower; Reference Letter: C, D, J - As we did in Symphony of the Night and its ilk, we exit the lab from the west and arrive at the chapel. The stage's first section features all of the hallmarks of Castlevania's house of worship: large, intricately designed stain-glass windows and other devotional architecture. Its labyrinthine center point splits into two paths, both of which encompass portions of both the upper ruins and the upper bridge: The top path is comprised of collapsing bridges--the type we remember from Symphony--and it's flooded with the usual flying enemies; and the bottom path takes us through the ruins' underside--a previously untraveled dilapidated, cobweb filled cavern. Both paths curl inward and take us to the boss' chamber.
Stage 5: Clock Tower; Reference Letter: K - What we learned in Stage 4 is that the castle's normally-separated upper sections have been merged into one all-encompassing area; thus we've already covered both of the castle's halves, and our traversing of these heights offers us direct access to the clock tower. Rebirth's clock tower is greatly expanded, making for one its largest forms, yet its design is still fairly typical. Its comprised of several towers whose navigation requires platforming across and around spinning gears, swinging pendulums, trap-filled elevator shafts, and other dangerous contraptions. All available paths take us up to the castle's second-highest point.
Stage 6: Castle Keep; Reference Letter: L - From there we move up and onto the castle's peak--to the castle keep, where Dracula dwells. Standing in contrast to what we've seen previously, the keep is largely prototypical and doesn't endeavor to stretch the mold. It features the standard elements: The long stairway leading up to a short hallway, with its diamond-pattern windows, and Dracula's throne room. Minor additions include a second short hallway and the secret attic we remember from Rondo and Symphony.
 |
|||
|
[Home] [What's New?] [CV Library] [Stages] [Reviews] [Weapons] [Castleography] [Multimedia] [Codes] [Links] |
||||