
![]() Changing Faces
Changing Faces ![]()
| . | . |
  |
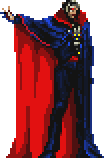
The "Final Stage" battle in Symphony of the Night is a story refresher for those who missed its true prequel--Rondo of Blood. Taking control of Richter Belmont, you'll have yourself a deja vu showdown with a very familiar Dracula form. It would be redundant to repeat Dracula's attack cycle here, so retreat a few games back if you wish to catch up. The true significance of this redux is that Richter's performance against the Dark Lord determines Alucard's starting statistics whence the real quest begins. If you take too many hits, Alucard's potency won't be would it could have. Though, Richter can't die--if his energy is fully drained, the young Maria Renard will make an appearance and will with the assistance of her animal friends resuscitate and enchant Richter to the point of invincibility.
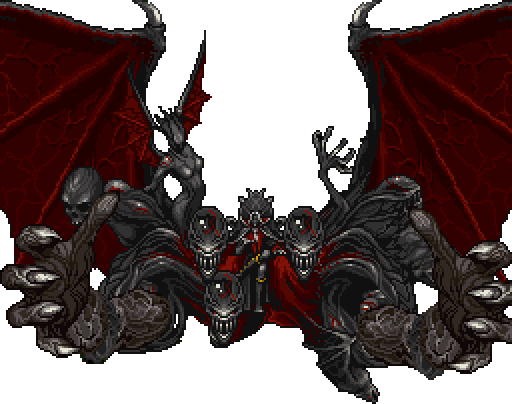 |
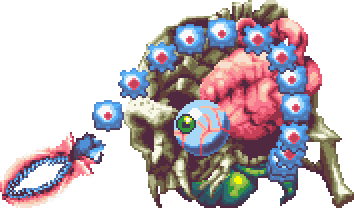
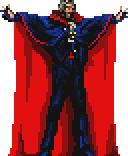
It might be that Dracula is bored with what his become routine. This, his one final form, doesn't even take to combat man-to-man; rather, he relaxes in his throne and lets his electrically-mutated cape (think Spawn) do all of the work. The mutation is that of three alien-looking heads with on either side a giant clawed hand; the three heads swirl and cycle about and suddenly stab themselves in Alucard's direction. Otherwise, they'll combine their chaotic propensity and fire toward him three-four triangle-shaped projectiles. All the while, the clawed hands will continue to unmercifully swipe at the centered hero; positioning Alucard at the screen's edges won't work because a hand can still catch him on the reset. To quickly change the pace, the entire abomination will retreat to distance, far back, and from there blast forward a large ball of energy, which if not dodged will devastate Alucard. For healing purposes, Dracula will conjure between its claws a powerful boss creature, like Slogra or the Succubus, and crush it to a bloody death, using its blood as a health restore. There's no real strategy here--just slug away with all you have in reserve.
| . | . |
 |
Chronologically, this is Dracula's first real battle against a battle Belmont warrior. Still, from your perspective, it's a typical "Game Boy" Dracula form--if anything, more the middle ground between his console and handheld skins. Dracula will teleport all around the room, appearing on any of its six platforms, in a fairly obvious pattern. He will between each teleport open up his cape and release a larger-than-expected three-direction fireball attack. All in all, it's a standard Dracula form that does little to prepare you for the real battle.
 |
That battle would be against this inexplicable demon, a large devilish bat creature that has trapped within its gigantic frame the many tortured souls it governs. While the frame remains stationary, the horned cranium will continue to teleport around to random locations. Each time the head appears in a new location, it will fire in all directions an eight-directional projectile spreadshot that will at any position leave very little in the way of open space. While you maneuver yourself around in defensive posture or in preparation for its reappearance, you'll want to keep in mind the two bottomless pits carved into the chamber's floor. With all of the surrounding madness, you'll have to find a way to score many direct headshots. A little soul power may very well help your cause.
| . | . |
 |
This battle will be fought atop an unsteady castle tower, from where Dracula will primarily use his classic teleportation to confuse the heroes. That is, he'll teleport to any of its four corners while occasionally popping up somewhere in the center, which will keep them running about like madmen (or madwomen). His teleports can be traced, somewhat, by following the progress of the bouncing electrical current; though, the current will sometimes split into four and scatter as to not fully telegraph the Count's next location, which forces the heroes to commit to a direction. He has two attacks to boot: He'll release with homing power three flaming-bat projectiles, or he'll cause explosions that spread outward, all around, as green sonic rings. Late into the battle, he'll begin igniting in flames the entire area, to cause the usual devastation and therein limit the heroes' movements. Still, you haven't seen anything yet.
 |
Dracula uses his remaining power (a) to transform into Drago, a powerful dragon-sized creature, and (b) to transport both parties to a endless desert realm where the next battle will begin. The entire ordeal can be summed up in two words: Mass chaos. Drago has two basic attacks: It'll spit toward the ground fireballs, which will explode and cause small sandstorms, or it will lean forward and breathe heavy steam all around. To keep the heroes at a distance, it will in sensing their proximity sift its claws through the sand, causing it to violently spill over; otherwise, it will attack from underneath the sand with what will appear to be randomly placed nuclear explosions. If you get too close to Drago, it will gather itself, channel dark energy, and with explosive force knock the heroes far back. If the heroes remain too far away, Drago will command two skeledragon-type creatures to further clutter the immediate area while chasing them down. If you don't fight intelligently and with great patience, you'll be in for a hasty defeat.
| . | . |
 |
While Legacy of Darkness is Castlevania 64's virtual expansion pak, its main hero, Cornell, has his own encounter with the Dark Lord. You'll remember his first form as the "servant" from Castlevania 64, but is in this case very much "Dracula." For what this Dracula form can do, I'll defer to the commentary reserved for the servant: (1) He can release his classic three-way fireballs, in actuality a flaming-bat attack with homing power. (2) He'll cause explosions that spread outward--all around and consecutively high and low--as blue sonic rings. (3) He'll expel from his hand pressurized steam. (4) He'll emit in all directions electrical charges. And (5) he'll use a spell to vacuum in Cornell so that he can grab him, suck his blood, and infect him with a vampire curse that must be cured if the man-beast is to continue mounting his own offense. As is the norm, you can damage the Count only by striking his head.
 |
 The
battle against this large form, called "Ultimate Dracula," is
a little bit different perspective-wise. That is, Cornell will be positioned
in front of Dracula on one plane while the Dark Lord occupies at different
times two background planes--one close, the other far back. The object here
is to strike the little face located below Dracula's chest. Though, it's
hardly an easy task because the skin around it only opens sporadically.
While in the front plane, Dracula will (a) cause lightning bolts to strike
down and on impact lift Cornell sky-high, (b) viciously swipe his clawed
hand, or (c) vacuum in Cornell, grab onto him, toss him high into the air,
and on his descent bomb him with repeated laser blasts. When Ultimate Dracula
jumps to the far plane, it will execute a separate set of attacks: (1) It
will send Cornell's way several heat-seeking meteors. (2) It will launch
forward a series of ice shards, each flying in at a fixed direction. Or
(3) it will summon a pack of tortured souls and command them to stalk and
overwhelm Cornell. For best reference: Ultimate Dracula jumps between planes
and attacks in an obvious pattern (a-1, b-2, c-3).
The
battle against this large form, called "Ultimate Dracula," is
a little bit different perspective-wise. That is, Cornell will be positioned
in front of Dracula on one plane while the Dark Lord occupies at different
times two background planes--one close, the other far back. The object here
is to strike the little face located below Dracula's chest. Though, it's
hardly an easy task because the skin around it only opens sporadically.
While in the front plane, Dracula will (a) cause lightning bolts to strike
down and on impact lift Cornell sky-high, (b) viciously swipe his clawed
hand, or (c) vacuum in Cornell, grab onto him, toss him high into the air,
and on his descent bomb him with repeated laser blasts. When Ultimate Dracula
jumps to the far plane, it will execute a separate set of attacks: (1) It
will send Cornell's way several heat-seeking meteors. (2) It will launch
forward a series of ice shards, each flying in at a fixed direction. Or
(3) it will summon a pack of tortured souls and command them to stalk and
overwhelm Cornell. For best reference: Ultimate Dracula jumps between planes
and attacks in an obvious pattern (a-1, b-2, c-3).
| . | . |
 |
Dracula's first form in Circle of the Moon is nothing more than a warm-up for his second, harder form. He can, this time, choose between three separate attacks, and, not shockingly, he'll be teleporting about all the while. The first, more traditional attack is his classic three-way flaming-bat projectile. The second attack, imported from the Dracula X titles, sees the high-and-low release of two large masses--in this case fiery apparitions in the shape of wolf heads--that rev up and blast in Nathan's direction. And, finally, he'll toss out a flurry of yellow flames that for a long period spout in all directions. Nathan's true advantage is that he can damage Dracula by striking his head and the extremities below.
  |
Within a dark realm, you'll battle Dracula's second form--and it's one with which to be reckoned. If that's been said before, it takes on a new meaning here. The demon retains its teleportation, which it will use to effectively appear on Nathan's level for a surprise attack. Nathan's objective is to strike the eye located below its chest (a challenge similar to Legacy of Darkness' Ultimate Dracula battle); the eye remains open only for a limited time after a teleport's completion, after which it will execute one of three attacks: (1) It will project long-reaching lasers and lower them down forty-five degrees, upon impact causing flames to rise up from the ground. (2) Its fang-adorned worm legs will open up and expel poisonous acid clouds. And (3), as its most devastating option, it will summon a long-lasting meteor shower. When damaged sufficiently, it will change color and speed across the battlefield one-four times; it cannot be hurt during this time, and any contact made will cripple Nathan. After a round of these mad dashes, it will reappear in floating-eye form, surrounding by a swarm of bats that protect it as a shield. The pattern of mad dash-floating eye continues until the eye is destroyed.
| . | . |
 |
For a while, Dracula's appearance in Harmony of Dissonance was one of its best-kept secrets. But he's back, and this time, it's personal. The Dark Lord, called in this instance the "Dracula Wraith," will in his initial form take to battle as you'd expect (more so if you've played the Dracula X games): He'll teleport to a random location, unleash an attack, and then quickly vanish. The rather unmotivated Count has, this time, only two offensive options: Most frequently, he'll open his cape and release his trusty three-directional fireballs, which Juste can easily leap over and in the process score a headshot. Or he'll expel one after another seven flaming spheres--one high, the next low, etc.--that after release rev up and blast toward Juste.

With his power depleted, Dracula takes this form, what I can best describe as a decomposed, disembodied skull that's been cracked in half (or as noted by Cattailwarrior63 a composite of the six body parts). Most pertinent to Juste is that its eyeball is exposed and, for whatever reason, it has a single clawed limb growing out of its jaw joint--the two features on which he must concentrate. Most prominently, it will swirl the claw around at a great distance, the limb extendable, and try to force contact via a foolish maneuver. At random intervals, it will pull back the claw and then quickly re-extend it, in a stabbing motion, toward the exact point in which Juste stands. The eye, too, is active: At any time, it will channel energy and fire forward an expanding laser, which can only be avoided by a crouching Juste. The problem here isn't that the attacks are random--it's that they're prone to happen at the exact same time; in such a case, Juste is destined to take a hit, so it's for him a case of "pick your poison."
| . |
Castlevania:
Aria of Sorrow
|
. |
 |
While Dracula doesn't make a physical appearance in Aria of Sorrow, his power's leaking essence does. Since the leaking powers seek a host, and Soma Cruz is deemed to have powers that mimic the Dark Lord's, it's he who becomes a target of the chaos' aggression. It intends to create of out of the young man a true Dracula successor, and it will do this by sapping away his collected souls and using them as means for the transition. The leaking energy manifests into a portal featuring three winged statues, each designated the task of caring for a category of soul; as the portal continues to rotate, Soma's job is to destroy the soul-carrying statues, which have individual powers: The one blue-carrying transforms into a stone-bat creature and quickly lunges toward Soma before returning to its original position. The one red-carrying accurately fires in Soma's direction three diamond-shaped projectiles. And the one orange-carrying targets Soma with a reticule that drains his magic power.
 |
 Now
that the portal is destroyed, the source's true form is revealed. Soma's next
job is theoretically simple: He'll have to destroy the glowing orb in the
center of the screen. However, he'll find that he can cause only minimal damage;
to change this, he'll have to weaken the source by destroying any of the four
eyes on its sides. When Soma destroys a single eye, the orb will weaken a
bit, and he'll be able to upon striking it inflict more damage. Aiming to
prevent the orb's destruction is a strange floating skeledragon that flies
by periodically; it unexpectedly flies in from any direction. Not to be content,
the orb has two attacks of its own: (1) It'll surround with spikes and then
fire them one after another successively counterclockwise. Or (2) it will
expel small green magnetic blobs that will slowly stalk Soma during the ensuing
chaos; if struck without being destroyed, the blobs will simply repel and
then continue forward their respective treks.
Now
that the portal is destroyed, the source's true form is revealed. Soma's next
job is theoretically simple: He'll have to destroy the glowing orb in the
center of the screen. However, he'll find that he can cause only minimal damage;
to change this, he'll have to weaken the source by destroying any of the four
eyes on its sides. When Soma destroys a single eye, the orb will weaken a
bit, and he'll be able to upon striking it inflict more damage. Aiming to
prevent the orb's destruction is a strange floating skeledragon that flies
by periodically; it unexpectedly flies in from any direction. Not to be content,
the orb has two attacks of its own: (1) It'll surround with spikes and then
fire them one after another successively counterclockwise. Or (2) it will
expel small green magnetic blobs that will slowly stalk Soma during the ensuing
chaos; if struck without being destroyed, the blobs will simply repel and
then continue forward their respective treks.
| . |
Castlevania:
Dawn of Sorrow
|
. |
 |
Soma Cruz will in Julius Mode (which represents a non-canon story arc, a what-if account of Julius' adventures following Dawn of Sorrow's main tale) appear as "Dracula" or, at least, the very reincarnation of the Dark Lord. After throwing his blood-filled champagne glass to the ground, Soma will summon to his aid an invincible Gaibon familiar, which will stick close by its master and about every ten seconds attack with a vicious lunge; the heroes can be damaged by Gaibon only during these lunge attacks. Soma, himself, will continue to teleport in and out about the room; after each stop, he'll whip out a gigantic axe and rotate it around twice, causing heavy damage for any contact made. While the axe attack is not difficult to avoid or to counter, the Gaibon familiar serves as a real distraction and helps to keep your eyes off the real target.
 |
When the big tease is over, Soma will delve into Dracula's bag of tricks and morph into a familiar demon form. Though, this time, the ghost demon sports some new offense thanks to its always handy harpy familiar, and the going is sure to be a lot tougher than what you'll remember from Rondo and Symphony. Its propensity to jump high and far in an attempt to crowd the heroes into one side of the room hasn't changed, but what happens in between is a bigger concern. The most common attack, executed before the demon jumps, is for the harpy to summon a group of larva to erratically fly in, from diagonally above, when thereafter the demon will follow it up by spitting out a flame that treks along the ground in a wave. Less frequently, the harpy will summon a cloud of annoying locusts to scurry about the immediate area, but no fire-wave will follow. Eventually, the heroes will have to maneuver around the demon either by sliding beneath it or by flying over it in bat form (using Alucard) while keeping in mind its attacks.
| . |
Castlevania:
Curse of Darkness
|
. |
  |
The again-risen-early Count is hardly in poor condition. Though, his first form represents a traditional Dracula with thrown in a few new tricks: (1) He'll command spikes to rise up from the ground and in a wave of rubble chase the nimble Hector. (2) He'll release at close range three orange orbs, which explode seconds later. (3) He'll rise into the air, channel dark energy, and for a short period unleash outward, all around, a volcanic eruption. Or (4) he'll attempt to "cut Hector to pieces" by teleporting out and reappearing for a surprise grab-attack, which if successful will see the Count suck the blood out of Hector and in the process heal himself. To frustrate Hector and force him to run about, Dracula will sometimes use his normal teleport--he'll break into a swarm of bats and fly to a location across the way. When he teleports near the throne area, he'll reveal one last attack: Using his ring, he'll fire toward the ground a laser, with it etching a random pattern; seconds later, bursting flames will rise up from the carved crevices. Hector's best bet is to stay back, dodge the attacks, and let his Innocent Devils wail on the distracted Count.
 |
Now here's arguably the supreme Dracula form, which is reminiscent of Ultimate Dracula from Legacy of Darkness. Hector is relegated to a small stone platform that hovers in the middle of nothingness. Dracula will shift between two planes--up-close and far away. When in the distance, Dracula has a couple of special moves: He can fire a series of heat-seeking, arrow-shaped projectiles; he can from his chest expel across the area a large laser, an attack he'll hold while he circles the platform (thus, two well-timed dodges will be crucial); he can unleash over the whole area a deadly seismic air-wave; or he can come flying in with a devastating punch. After one or a combination of the aforementioned, he'll get up-close, which is precisely the time to strike. Though, it won't be easy because Dracula has some formidable offense, too, on this plane: He'll repeatedly throw single or quake-inducing hammer punches whose very motions leave behind a residual trails of poison mist, or he'll execute a grabbing swipe with which he can grab onto Hector and through a number of squeezes drain the life out of him. This form is as tough as it is large, so an insane amount of effort will be required, both from Hector and the assisting Innocent Devils; a large number of energy-replenishing items won't hurt.
| . |
Castlevania:
Portrait of Ruin
|
. |
  |
Ol' Drac is back for his second encounter with a Morris family member, but his typical "first form" hasn't readied many new tricks. The teleporting wonder this time alternates between two separate release attacks: Fireballs, which he fires in three waves--three-directional then five-directional then again three; and four pulsating orbs, which are fired in succession high, low, high and low. The very real danger (and a first for this series) is the battle's circumstance: Dracula has a tag-team partner in the form of Death, with whom he fights right alongside in honor of the game's running theme. Dracula peppers in his teleport attacks while Death muddles up the area with its scythe strikes; otherwise, Death will assist with team assaults, which include Dracula's bat-company dash, a scythe wave plus pulsating-orb storm, and an atomic explosion. As both share the same energy, you can focus a counterattack on either.
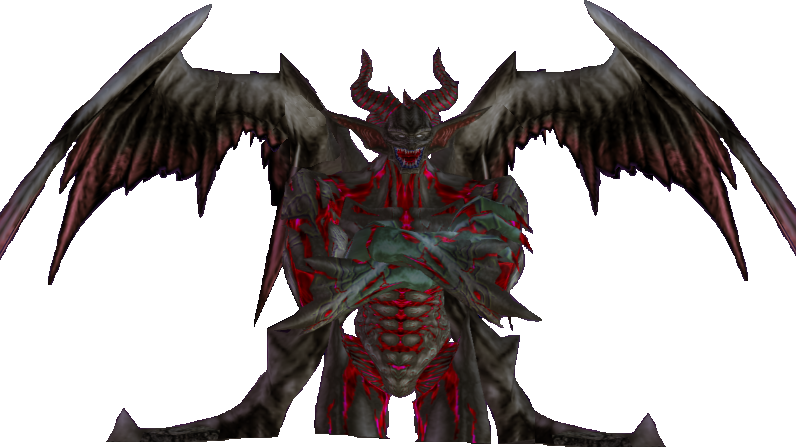
In clear danger of failing his mission, Death offers up his soul, which Dracula readily steals and uses as the catalyst for his transformation into True Dracula, a second form typical of recent games. The winged Count uses its room-filling size for a handful of devastating attacks that include a long-distance dash, a sudden ground-pound that causes damaging debris to fly forward, and the release of three large round flame-scythes. Additionally, Dracula can command a series of deadly missiles to rain down, each missile parallel to others which it accompanies, and leave the heroes precious little space to find safety as he continues to use his size to force collisions. When in trouble, Dracula will begin unleashing an attack that sees his claws quadruple in size and begin closing in on the heroes from either side; only by locating and striking the currently vulnerable finger, one after another, can the heroes thwart the attack, which if not met will close in and kill them in one shot.
| . |
Castlevania:
Order of Shadows
|
. |
   |
Dracula prefaces his declaration of war by admitting that he wasn't quite prepared to see resurrection "this soon." What that means to you is a battle not quite as epic as those you've fought in the past. This, our first Dark Lord encounter on the burgeoning mobile phone scene, is a more simple formula: Our teleporting friend attacks by releasing a flurry of the now-standard pulsating orbs (five in all), each randomly alternating between high, middle and low, and by otherwise commanding a lightning bolt to strike down at a distance relative to his own. Dracula's whole frame is vulnerable to attack, which means (depending on the mode) that you could probably absorb his attacks and launch a reckless deluge of whip snaps or sub-weapons to strike him down.
| . |
Castlevania:
Dracula X Chronicles
|
. |
Since this is a remake of Dracula X: Chi no Rondo, it should be no shock to you that Dracula is made to mimic the very same attack pattern: Dracula will teleport all about the castle keep throne room and in between release his three-directional fireballs. Added to the mix is his tried-and-true alternate projectile attack: After every fourth teleport, he'll unleash two large pulsating orbs--the first high, the second low--that rev up and blast in your direction. Since Dracula X Chronicles' physics are a bit different, in being 3D-based in design, Rondo veterans may have to change up their strategy a bit.
There are no surprises here, as the Dark Lord will be granted the power to change his shape into the familiar green monstrosity (as colored in the Symphony version of this final battle, for continuity purposes). The attack pattern hasn't changed: Dracula now aimlessly high-jumps about, using his girth to both intimidate and trap heroes in corners should they be foolish enough not to pass beneath him when he's too close to one side of the screen. After every third jump, he'll spit in out three huge balls of flame in three directions albeit not in your general direction; after a number of jumps thereafter, it'll gather itself into a corner and unleash across the way a wide scrolling blast that can only be crouched beneath. His main weakness is that he's a large target, so multi-strike weapons like birds and crosses will take him down quick.
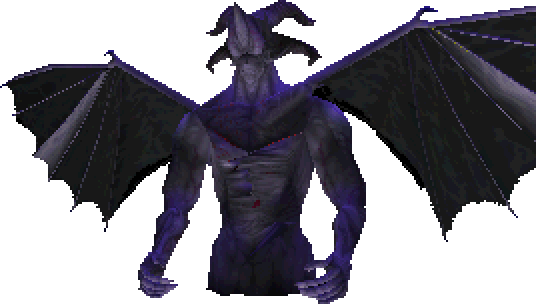
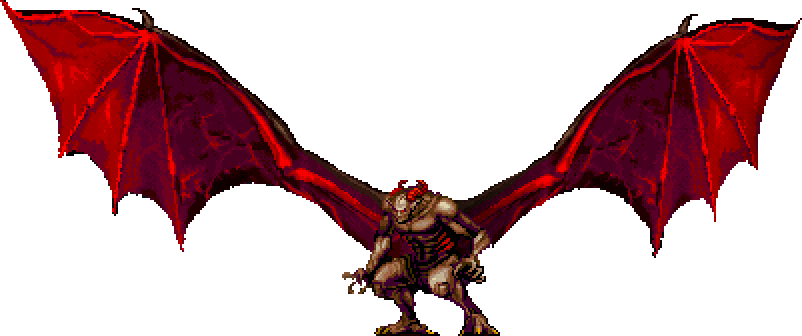
Expecting this, were you? The original game's creators were well aware that Rondo's final battle was classified as "too easy," so they add in yet another hurdle--Dracula in his "true form" fighting out the last of his moments in a fierce way. Now in humanoid-demon form, the six-winged Dracula will blur reality and collapse the backdrop to reveal the veil of chaos. He'll always start this battle by rushing to one side of the screen and summoning a long-lasting storm of poisonous blood that can only be avoided by standing beneath him. The still-teleporting Court has other tricks, like the release of an arching swarm of bats, commanding flame pillars (three in succession) to blast up from the hero's current position, and transforming into a wolf and charging in the hero's direction. When half his energy is gone, he'll fly overhead and release in a concentrated area a collection of large, deadly fireballs plus add in a space-ripping five-part slash, the last shot of which is lethal (also, he'll pick of the rate of his normal attacks and sometimes combine them, adding in a quick uppercut strike to protect against air attacks and a wave of flame that travels along the ground). When desperate, he'll release onto the field a red globule that distracts you while he begins striking in bat-swarm form--in between which relying on his normal attacks. Note that this battle will not occur if you don't defeat Shaft's Ghost by properly saving Annet.
Page 3: More Dracula Forms | Back
|
[Home] [What's New?] [CV Library] [Stages] [Reviews] [Weapons] [Castleography] [Multimedia] [Codes] [Links] |
||||