The Bosses
Abaddon is the
master of pestilent locusts from the deep abyss of the underworld. The multi-limbed
fiend hops about its chamber and is hardly a threat under this condition. However,
it has in its arsenal a feared attack: Using its cane, it can summon and direct
clouds of locusts, which will fly in from off-screen in semi- and half-circle
formations. Their speed and mass is such that there's little time to react and
find a safe spot, and failure to do so will result in repeated and often heavy
damage as the locusts pass. Though you can cut through the storm, even a single
locusts left behind can cause considerable damage--not to mention that Abaddon
will during this time continue his hopping.
|
|
Games In: Castlevania:
Dawn of Sorrow
& Castlevania: Portrait of Ruin
|
|
|
Similar Enemies:
None |
|
|
Forms List: Not
available |
Adramelech is gigantic
goat sacrificed as the embodiment of tortured souls, and it's trapped within
the bell tower's castle wall. Those many tortured souls protect its huge, vulnerable
head by forming into purple globs that crowd around each other, floating up
and down--and they keep forming one after another. Adremelch itself will attack
in two ways: It'll blast huge blue flames, about eight in a row, each in the
exact direction that you stand during its release; or it'll conjure souls in
the form of skull heads to swoopingly chase you from one side of the room to
the other--if you don't duck under them at first.
|
|
Games In: Castlevania:
Circle of the Moon
|
|
|
Similar Enemies:
None |
|
|
Forms List: Not
available |
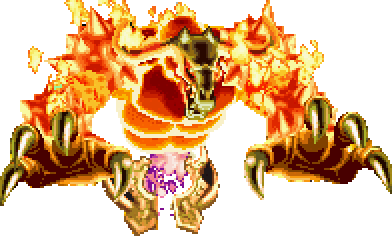
Aguni is a being
that is the embodiment of fire. It's this creature that takes control of Dario
Bossi and acts as an alternate boss when its possession is discovered. Primarily,
Aguni will fly off-screen and then emerge in flaming form to quickly to crash
into the ground, upon which it causes a giant flames to wave forward in either
direction. When stationary, it will instead spit three-four single fireballs
onto the ground, each of which will form a forward-moving wall of flame. Most
devastating is its physical attack, which sees it throw down three successive
palm strikes at the exact point in which the hero stands; otherwise,
it will zip through the air when it senses that you've grown comfortable in
your attack pattern. Aguni appears again in Portrait or Ruin (in the
chronology a prequel to Dawn of Sorrow) as one of Jonathan's
Nest of Evil challengers, and it's identical in description.
|
|
Games In: Castlevania:
Dawn of Sorrow
& Castlevania: Portrait of Ruin
|
|
|
Similar Enemies:
None |
|
|
Forms List:
Not available |
Akmodan guards the clock tower of Castlevania. Mummies
usually travel in pairs, but this boss is more powerful than those generic duos,
so it's a one-on-one battle to the death. Prominently: Akmodan has the ability
to teleport in and out via loose wrappings. While grounded, he can throw multiple
shards forward, with a large vertical range, and he can also shoot multiple
short-ranged fireballs as a secondary attack. Positioning is everything, as
defending against both of his abilities requires finding different safe spots.
|
|
Games In: Super
Castlevania IV
|
|
|
Similar Enemies:
Akmodan II & The Mummies |
|
|
Forms List: Available
|
Like his predecessor, Akmodan II will
present a solo challenge for you. This slow-moving mummy's main attack is
elongating his arms to stab at you, and he'll proceed to strangle you if he
grabs a hold in that initial thrust. If you allow him to hold on, he'll spin
you around and, with much force, throw you into the walls. If his grab attempt
fails, he'll poison the air of the immediate area with a deadly fumes. The
coffin that he drags around around can and will be used as a shield against
most of your attacks, and it'll present a large obstacle to get around. Despite
that, speedy players shouldn't have much trouble keeping their distance and
avoiding Akmodan's attacks.
|
|
Games In: Castlevania:
Symphony of the Night
|
|
|
Similar Enemies:
Akmodan |
|
|
Forms List:
Available |
Albus is an Ecclesia member and the
former colleague of hero Shanoa. His intentions unknown, Albus is a presumed
antagonist and feared for his expertise in the use of firearms, especially
his magic-powered pistol Argatha. Albus has a host of abilities not merely
limited to firing his pistol while standing or crouching, which while effective
is merely filler compared to his superpowered pistol attacks: The Optical
Shot, which discharges two erratic but deadly cycling-energy waves, and the
Max Shot, which fires a huge ball of energy that engulfs and devastates foes.
If Albus is successful in forcing a nearby enemy into the air, he'll punish
the airborne foe with the Triple Ignis, a prolonged flaming spinkick. Not
least is his Torpor Crystal, three of which he'll drop down, in an attempt
to trap his enemy, as he leaps across the room; each will sprout into a large
crystal that if touched will cause a petrified state.
|
|
Games In: Castlevania:
Order of Ecclesia
|
|
|
Similar Enemies:
Any hero-turned-villain |
|
|
Forms List:
Not available |
The son of Dracula might be an ally
in Castlevania III: Dracula's Curse and the hero of Symphony of
the Night, but in that third NES game and Castlevania Legends,
he acts a boss whose trust you must gain. His fighting style is almost identical
to his father's, with three-directional fireballs--but instead of traveling
by mist, he breaks up into a swarm of bats, reforming when the bats gather
together. In Legends, he prefers to utilize his skill with a sword,
throwing in a bat dash or two.
|
|
Games In: Castlevania
III: Dracula's Curse & Castlevania Legends
|
|
|
Similar Enemies:
Most of Dracula's first forms |
|
|
Forms List: Click
here for Alucard's complete bio |
The rather innocuous amoebae will appear
early on in its habitat and like a scoundrel attack from an unreachable location.
Get revenge later on by charging into its watery domain and attacking the
amoebae, which at first will seem invincible. Only after being struck repeatedly
will it reveal its weak point--a pink inner core, which once centric will
now begin shifting about the cell system, slivers of it sometimes breaching
the amoebae's natural boundaries. When the core is exposed as such, it can
be struck, causing damage to the amoebae. Its only resistance to your offensive
is a skull-head projectile, which it will arc in your direction quickly and
without notice.
|
|
Games In: Castlevania:
The Adventure Rebirth
|
|
|
Similar Enemies:
None |
|
|
Forms List:
Not available |
Dracula gets the best of both worlds with this supernaturally
bred creature--a trap that's half undead, half dragon. This beast attacks by
looping its neck bones back and forth between heads, each slicingly looping.
Each spine grows accordingly when the bones are received, keeping foes off balance
as spines grow and reduce. While dodging sharp neck bones, you must find a way
to strike either head; however, the heads will unexpectedly spit balls of flame
while this is going on. Their changing neck lengths may force you to attack
high and low, even though both heads share the same energy meter.
|
|
Games In: Castlevania
II: Belmont's Revenge
|
|
|
Similar Enemies:
None |
|
|
Forms List: Not
available |
Described as "fighting armor," three of
these big boys can be found in Castlevania: Bloodlines (only the first
two appear early on--the other one [blue] can be found later in the game); all
three of them are slow and plodding, and they fight by swinging their weapons
at ranges that vary; when they miss, they leave themselves open. The first one
(yellow) attacks with a mace, swinging it at short range; the second one (red)
attacks with a big axe, its range longer than the first's; and the third (blue)
prefers to use its fists, elongating them as far as the room spans. All three
are agile, too, and each is quicker than the last.
|
|
Games In: Castlevania:
Bloodlines
|
|
|
Similar Enemies:
None |
|
|
Forms List: Not
available |
Arthroverta is a giant mutant created
specifically to guard "the stronghold," which is in this case a
monastery used as a villainous hideaway. Despite being crab-like in nature,
its main feature and sole vulnerable area is the human face it leaves largely
unprotected; when the face is revealed, Arthroverta will rely on its two basic
attacks: A claw-slam using its left extremity (close attack) or a large web--an
arcing projectile as spewed from its face (ranged attack). When it clamps
shut its exoskeleton, covering the face, Arthroverta curls into a ball and
then begins rolling back and forth, violently crashing into the walls; only
heroes with air-lingering abilities will be able to avoid the onslaught.
|
|
Games In: Castlevania:
Order of Ecclesia
|
|
|
Similar Enemies:
None |
|
|
Forms List:
Not available |
Astarte is a
woman of irresistible beauty, and no man can defy her will. The cunning vixen
has four attacks that are executed at random, each considerable in its own
way. Her basic attack is to approach the hero(es) and strike with the pointy
tip of her veil, which she'll swing at medium length. She uses the staff for
separate attacks: "Take this!" she'll warn, releasing from the staff
a horizontal tornado. Too, she'll leap backwards and leave in her wake a triangular
energy wave that follows the sender. The final, and most dreaded, option is
Temptation, wherein Astarte will spray forward a stream of hearts; if contact
is made with either hero, the male of the group will be seduced and forced
to attack his partner, whose greatest fear now is the devastating strikes
of her partner's weapon.
|
|
Games In: Castlevania:
Portrait of Ruin
|
|
|
Similar Enemies:
None |
|
|
Forms List:
Not available |
Balore is a demon most renown for its
fear-inducing gaze. Though, it's probably more dreaded for two of its other
attributes: Its humongous size and its terrifyingly overmuscled limbs. Balore,
truly, is as intimidating as it is deadly. Though, its sheer size is hardly
the issue because the demon is usually embedded within a wall or stuffed between
the floor and ceiling of a narrow castle chamber. To compensate, Balore will
viciously swing its arms about the room, attempting to crush the hero along
its surfaces. Otherwise, Balore will reveal its feared gazed by firing from
its currently-open eye a devastating laser attack.
|
|
Games In: Castlevania:
Aria of Sorrow, Castlevania: Dawn of Sorrow
& Castlevania: Portrait of Ruin
|
|
|
Similar Enemies:
Giant Golem |
|
|
Forms List:
Available |
Barlowe is the founder of Ecclesia,
a once noble outfit whose name was forever marred when its leader fell victim
to the temptation of Dracula's power and became its vessel. Now a pitiable
madman, Barlowe puts on display his considerable magical power in a student-versus-teacher
confrontation. He has five spells at his command: Cutting Truth, using which
he encases himself in an electrical field and quickly flies across the room;
a fire spell in which he'll enflame several books and toss them at the hero;
Globus, which fires two balls of plasma that erratically rebound off of walls;
and the ice spell Glacius, by which dropping his book will cause the both
the ground and any inexperienced hero standing upon it to freeze over,
setting he or she up for a lightning attack. When angered by prolonged resistance,
he'll begin warping in from alternate sides of the room with highly damaging
flame-punches--this while ranting about his ungrateful apprentices.
|
|
Games In: Castlevania:
Order of Ecclesia
|
|
|
Similar Enemies:
Shaft & Ice Lord |
|
|
Forms List:
Not available |
This "company"
is a group of bats that thinks and acts as a single entity. The considerably
populated group will primarily fly all around and use its size to crowd and
repeatedly damage the hero, who can barely hop over the swarm. If they manage
to trap the hero at a center position, they can grab hold and rapidly drain
his or her energy until an escape is made. Otherwise, the group will signal
its next attack by expanding out and quickly receding--that is, it will form
a more close-knit formation and begin releasing a storm of damaging sonic
rings, which will surely distract from the target.
|
|
Games In: Castlevania:
Dawn of Sorrow
|
|
|
Similar Enemies:
Phantom Bat and Zapf Bat |
|
|
Forms List:
Available |
Even though the name Beezelbub is usually associated
with Satan, this seems to be just a huge, tortured zombie. As the Lord of the
Flies, it commands flies, big and small, to protect itself; worms are summoned
to walk along the ground, too, and they're poisonous. The blood dripping from
Beezelbub's open wounds is also poisonous; however, getting in-close is the
only way to make your mark, so these obstacles must be overcome. While hitting
it in the head does the most damage, you can attack him elsewhere. But if you
attack its limbs enough, they'll fall off--meaning you'll have to attack its
head one way or another.
|
|
Games In: Castlevania:
Symphony of the Night
|
|
|
Similar Enemies:
None |
|
|
Forms List: Not
available |
The Behemoth
is a beast that rebelled against heaven but suffered defeat; it fights on
even after death. It made its series mark as a minor annoyance in the Dracula
X titles, where it bulldozed its way forward, chasing away pesky heroes;
it later appeared in the two N64 titles as a huge boss creature; now, finally,
it makes its first traditional boss appearance. After an initial chase,
where it rampages through a room of shaky pillars, it surprises the heroes
with an onslaught. The Behemoth either bullishly
stampedes or throws itself forward and continues off-screen; it will seconds
later reappear from the exit point with an unexpected half-room charge. While
grounded, it will lash forward its tongue to damage equally grounded heroes,
or will spit out at troubling range a series of poisonous globs of bloods.
The Big Golem is a tough man-like figure molded out
of the soil and animated by dark magic. The golem is another of those enemies
that erratically steps forward and back to dictate the speed of the battle--to
catch you off guard when it looks as though it's retreating. When the golem
hunches over, it's a clear sign that its about to swing its arm directly into
your direction; when it stands upright, it will instead regurgitate a storm
of rocky debris, funneling the attack into an arc. Even though these two attacks
are easy to telegraph and dodge, and even though the golem is never really a
threat to corner you, its overall devastating to your health if any kind of
contact is made.
|
|
Games In: Castlevania:
Aria of Sorrow
|
|
|
Similar Enemies:
Living Armor and Great Armor |
|
|
Forms List:
Not available |