![]() The Bloody Road
The Bloody Road ![]()
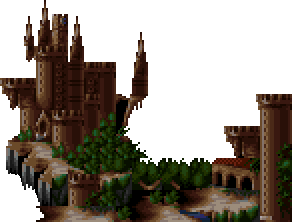
No matter which route through which the Belmonts have traveled--woods, caves, tunnels, pirate ships, etc.--it has always lead them to the castle of legend. On these next two pages, which represent part two of the castle overview, I'll look at each game individually, using the large map below to point out and compare recurring areas. Note, though, that I'll only be comparing areas from game to game from inside the castle; almost none of the aforementioned areas that lead to the castle will be covered. Each game covered will also be potentially accompanied by up to two maps--a land and castle map from within the game, if available. (Though the land areas won't be mentioned, they can instead be visibly compared.) I'll begin with Haunted Castle, as I like to do, since it's a non-Castlevania-titled game. Listed with each stage description is a reference letter, which you can use to pinpoint the stage's location on the common map shown below.
(Games excluded for lack of any true structure or absence of Dracula's castle: Castlevania Lament of Innocence and Castlevania: Order of Shadows.)


|
Land
and Castle Map
|
|
 |
Stage 3: The Main Hall; Reference Letter: A - As quickly becomes procedure: This is usually the first area encountered once the castle is entered. These halls don't have much in common with their Castlevania counterparts other than the familiar Vampire Killer music.
Stage 4: Abandoned Mine; Reference Letter: F - Instead of upward, the halls lead down to here, one of the underground areas. This would be deep down to where these same mines are located in Symphony.
Stage 5: The Clock Tower; Reference Letter: K - Instead of traveling through the rightmost tier of the castle, Simon travels up a lift that takes him over the castle center and straight up to letter K, the clock tower.
Stage 6: Castle Keep; Reference Letter: L - Exiting from the left of the clock tower, Simon will be here, the familiar castle keep. Instead of a staircase, the sometimes-substitute fallaway bridge (J, usually before the clock tower) leads directly into the Dracula's throne room.
![]()

|
Land
Map
|
Castle
Map
|
|
No Map Available
|
No Map Available
|
Stage 1: The Main Hall; Reference Letter: A - This is virtually the same game as Castlevania, so its map is 100% representative of this game, too. Starting from letter N, you'll enter into A and traverse those same halls.
Stage 2: Torture Lab; Reference Letter: B - This Medusa-holding stage is actually the alchemy lab you'd otherwise travel through in Symphony. It passes through F, its center, which would later become the underground warehouse in Circle of the Moon.
Stage 3: Castle Ruins; Reference Letter: C - Before all of the stone and marble sculptures found residence in that warehouse, it was stored here, the upper tier of the castle. The first area, populated by hunchbacks and bone-throwing skeletons, also serves as the castle's lookout tower.
Stage 4: The Catacombs; Reference Letter: F - This would be the first F after falling from the end of stage 3. This subterranean cave leads out into G, the outside ruins. From here, it's back into the castle via a series of tunnels.
Stage 5: The Dungeon; Reference Letter: H - Frankenstein and Igor's chamber from the stage before is actually the start of this area, since Frank likes to hang around here (see Super Castlevania IV). The Dungeon here has its own Dracula gallery, which means that the top of the area could be the tail-end of the audience room from Circle of the Moon.
Stage 6: Castle Keep; Reference Letter: L - The Keep here, as in Castlevania, is a combination of J, K and L--the long bridge, the clock tower and the Keep itself, and it's bigger than usual. The long bridge leads to a series of rooms that encompass the tower (seen only in the background) before leading to a door that exits into the Keep.
![]()

|
Castle
Map
|
|
 |
Stage 1: The Main Hall; Reference Letter: A - Starting from the castle entrance again (N), it's in to A. The fishman room, as I call it, branches into the F closest to it, since part of this waterway serves as underground access into the castle (as in Castlevania 64).
Stage 2: Torture Lab; Reference Letter: B - This is a bit different from Vampire Killer in that you pass over what would otherwise be the Underground Warehouse and enter into the Medusa's chamber which is also the starting point of the chapel that spans under stage 3.
Stage 3: Castle Ruins; Reference Letter: C - The ruins here serve as the lookout tower, where you can ominously see the Castle Keep hovering in the background. The ruins enter into the aforementioned chapel (around where you battle the Hippogryph in Symphony), where an abyss (E) will have you fall to an F point. Half of that long pit is present in Circle of the Moon, which you enter to from the Ceremonial Room.
Stage 4: The Catacombs; Reference Letter: F - This is also the first F after falling from the end of stage 3. The stalagmite-filled, watery caves lead up the ruins--at this point, a sort of backyard for the castle. From here, it's back into the castle through a long tunnel.
Stage 5: The Dungeon; Reference Letter: H - The dungeon hasn't changed from Vampire Killer. Instead of passing through what may be the gallery, you pass through an area that later becomes the treasury. When the red worn-out curtains can be seen, the Reaper is near.
Stage 6: Castle Keep; Reference Letter: L - Like Vampire Killer, though, this stage is comprised of areas J, K and L, with the Clock Tower again a simple set of backgrounds. A door leads out the Keep, where a staircase leads to Dracula--a trend that would become a series' staple.
![]()

|
Land
Map
|
Castle
Map
|
|
No Map Available
|
No Map Available
|
Castlevania; Reference Letter: N, A and Y - This is an area rather than a stage. You'll enter the castle from the entrance (N), over an elevated bridge rather than through the meticulously missing woods. From there, it's into the remnants of the collapsed castle from the previous game, Castlevania. Rather than proceeding through the halls, it's down into the abandoned warehouse and into the lower-than-usual--and in this game purposely-sealed-off--ceremonial room.
![]()
|
Land
Map
|
Castle
Map
|
 |
 |
Stage 11: Castle Basement; Reference Letter: F - This F would be one found near the castle's center, and it acts as stage 1 of the alternate entrance into the castle. This stage is no more than the whole version of the caves used to travel to Frankenstein in the first Castlevania--with low-lying stalagmite-filled ceilings and watery traps.
Stage 12: Mountain Range; Reference Letter: Q - As stage 2 of the alternate entrance, you'll emerge from behind the castle and travel way up through the observation tower (rightmost S) and back to the outer structure of the castle.
Stage 13: Lookout Tower; Reference Letter: S - This is the second rightmost S. Since the whole first part of the castle is skipped over in this game, this tower winds up on the right half instead. Once you reach the top of the tower, it's back down to where you reenter into the castle's interior.
Stage 14: Main Hall; Reference Letter: H - This stage is an enigma. The first part of it resembles the main halls that would otherwise be represented by letter A, but it's too late in the castle for these to be those same halls. Instead, it's a similar-looking area that's actually the dungeon; besides, the Reaper, too, usually hangs around in areas that resemble the main halls, what with the worn-out curtains and all.
Stage 15: Castle Leg; Reference Letter: S - This is indeed another tower, one in the same with the hidden springs you'd find in Castlevania: Dracula X. To get into this area, the castle's water supply, you'll first travel through some extended ruins; then it's up all upward to the long bridge (J).
Stage 16: Castle Keep; Reference Letter: L - Once again, the keep and clock tower are contained within the same stage. If you look at the stage mapped-out, you can see a similar structure as in Rondo and Symphony, with the swinging pendulums leading out into the castle keep.
![]()

|
Land
Map
|
Castle
Map
|
|
No Map Available
|
No Map Available
|
Stage 2: The Caverns; Reference Letter: F - This stage is a bit disjointed, so the closest this would be is one of the Fs near the castle entrance (A). This is just a standard set of caves with little to no connection the caverns you've seen before.
Stage 3: Death Tower; Reference Letter: S - This tower is the one just above B (the alchemy lab). As the castle's sort-of leftmost clock tower, you'll travel through this production area, way up to around one of the top Ss.
Stage 4: Castlevania; Reference Letter: D, P - This is the heart of castle as defined by this game's route. The start of this area is somewhere around the long bridge that led to the mummies (P) in Castlevania. From there, an otherwise unavailable structure (P, the armory) takes you [skips] into the clock tower, up, around and down into the stair-less castle keep.
![]()

|
Land
Map
|
Castle
Map
|
 |
 |
Stage 5: Castle Entrance; Reference Letter: N - This twisted path takes you up through the forest of silence and across the standard entranceway. Rather than torches, the primary visuals here are the Sypha-like statues. Maybe Trevor didn't save her after all?
Stage 6: Main Hall; Reference Letter: A - Returning to standard procedure, it's into the castle via its famous halls. The castle structure has changed a bit, so its upward as we skip over the lab and castle center and head right along and through the gallery (X).
Stage 7: Long Library; Reference Letter: O - From X, it's straight-away, through the ceremonial room and into the lower portions of the library (perhaps below the Master Librarian's room from Symphony). You'll loop around this area and head upward.
Stage 8: The Dungeon; Reference Letter: H - No jumps are made here, as it's right out of the library and into this torturous area, looking more drab and trap-filled than ever. From here, the path continues to go straight, leading to the tail-end of the castle.
Stage 9: The Treasury; Reference Letter: S - This S would be very high up and far to the right of this section of the castle--since you enter from its top. Once inside, you travel downward and through its coves, which end somewhere near the end of path J.
Stage 10: Clock Tower; Reference Letter: K - From one tower, you drop into the other. The tower here is so huge, it actually spreads into the next stage. It's business as usual as you make your way all the way to top via the gears and latches.
Stage 11: Castle Keep; Reference Letter: K, L - To get here, another small clock tower must be traversed. Once atop this last tower, it's up and around to the highest point of the castle, where the familiar staircase beckons you to the final battle.
![]()

|
Land
Map
|
Castle
Map
|
 |
 |
Stage 5: Castle Entrance; Reference Letter: C - The entrance here isn't the typical one. Rather, you gain entry from the ruins--mainly the leftmost lookout tower. And the whole right half of the castle is off limits altogether. So, it's up and through the interior of this spiky tower and down to its exit.
Stage 6: The Chapel; Reference Letter: D - This chapel is very Symphony-like in design, with its stained-glass windows abound, and it leads through all of D, up into P (the again-accesible armory), and right to a bridge.
Stage 7: Final Leg; Reference Letter: L - This is an alternate path into the keep, and it's similar to the bridge on its other side (J). From this even higher location, you drop down right into Dracula's throne room, whereas you'd otherwise take the stairs from the other side.
![]()

|
Castle
Map
|
|
 |
|
Point to the map
version of your choice
|
|
|
X68000 Version
|
Chronicles Version
|
Stage 1: Main Hall; Reference Letter: A - As a clone of the original, you begin at N and enter into the main halls. The path is altogether the same as you've come to know.
Stage 2: Abandoned Mine; Reference Letter: F - After exiting the halls around U (the courtyard), it's down into the nearby depths for this set of caves that eventually become flooded and lead you back up--to the outside of the castle.
Stage 3: Woods/Ice Cave; Reference Letter: T, U, G - This garden, located directly outside of the main halls, leads to a small woodland, through the ruins, and into an ice cave. Hunchback-dropping eagles will, as always, be a problem. After dispensing of this stage's boss, you travel directly upward, into the left side of the castle.
Stage 4: The Outer Wall; Reference Letter: V, D - Think of the second stage of Castlevania with some length. This is the tail-end of the castle--as it was in Symphony--and it this time more closely resembles that Castlevania's second stage, with similar tricks and traps; this can only mean that this castle's incarnation has its chapel on the right side, which justifies the "D" reference despite the area's placement.
Stage 5: Clock Tower; Reference Letter: K - The lab this time leads to an alternate entrance of the clock tower, as in Castlevania: The Adventure. It's mostly upward, but its path leads straight-away--an unusual course to take through this area.
Stage 6: Toy Room/Hall of Mirrors; Reference Letter: S - This could be any of the rightmost towers of the castle. In this case, a short bridge takes you into the first section of the tower that has deadly toys scattered throughout; this leads into the hall of mirrors, which would be as far right into the castle as you can go.
Stage 7: The Dungeon; Reference Letter: H - Making life tough, Simon drops downward, goes around, and reenters into the dungeon--a remake of Castlevania's stage 5. This path circles upward and left to where it normally does, with a meeting with Death at its end.
Stage 8: Castle Keep; Reference Letter: L - Having already conquered the clock tower, Simon travels across an ulterior path into the armory (P). From here, he travels upward to the castle's highest point, finding his way to that familiar stairway. Dracula awaits.
![]()

|
Land
and Castle Map
|
|
 |
Stage 2: Main Hall; Reference Letter: A, N - The entrance entails the eerie woods, and it's more enemy-heavy than ever. This leads into the halls, taking their normal form with a little length added on. Once into the final room of this area, where you normally meet the Phantom Bat, you'll exit into the garden.
Stage 3: The Chapel; Reference Letter: D - However he does it, Richter bypasses the alchemy lab and enters into the chapel. Even though it seems off course, Richter travels through the stain-glass surroundings and reaches the end of D.
Stage 3': The Graveyard; Reference Letter: U - If he takes an alternate path of stage 2, he travels away from the castle and winds up in the courtyard and its far-off graveyard. This leads all the way through U and into G (the ruins).
Stage 4: The Dungeon; Reference Letter: H - From either stage 3, you can enter the dungeon--from alternate stage 3's trek into the ruins or through regular 3's trek across the castle center. The dungeon is all the same, save for more cunning tricks and the residence of a boulder-moving Cyclops.
Stage 4': Mountain Range; Reference Letter: Q - From regular stage 3, Richter can elect to not reenter the castle and skip around through more woods into the mountain range. Through the woods, Richter'll make his way to the shore, where he hopes to board a ship and reenter the castle from a higher location.
Stage 6: Marble Gallery; Reference Letter: X - Whether he used the mountain range to travel by ghost ship and along the docks or continued through the dungeon, Richter arrives at the tail-end of the marble gallery, where a bevy of bosses await him.
Stage 7: Clock Tower; Reference Letter: J, K - From the high point of the gallery, Richter skips into the outer wall and quickly out another door to the bridge that leads to the clock tower. Sharing a similar structure with Symphony's (and both Castlevania and Dracula's Curse to a lesser extent), the tower leads directly out to the castle keep.
Stage 8: Castle Keep; Reference Letter: L - This, for once, is the whole stage instead of being a part of a larger one. It's just a quick trip up a flight of stairs and into the throne room of the Prince of Darkness.
![]()
|
Land
Map
|
|
 |
Stage 1: Ruins of Castlevania; Reference Letter: N, A, L - As far as Castlevania goes, this is the only stage you'll cross, and it's a stage that represents the entire castle. First, it's through the main halls as you've come to know them. This leads into the alchemy lab (with spike traps of all kind), but it exits into an upper, outer portion of where the chapel was before the castle was destroyed. Once outside, you can directly reach the castle keep by climbing up the spinal column of some deceased creature (perhaps Galamoth?), conveniently skipping over a large portion of the castle that other Belmonts were once forced to travel. Once atop the bone structure, the Dracula-less castle keep awaits.
![]()
|
Land
and Castle Map
|
|
 |
Stage 2: Castle Entrance; Reference Letter: N - Most of the stages in this game are an amalgamation, and this one combines sections N and A. This leads through the castle halls, upward and outside the castle.
Stage 3: Castle Center; Reference Letter: R - That outside area is here, the castle center, with the outer wall towering above. Within the center, it's through more curtained halls and a watery labyrinth before you reenter the left tier of the castle into the chapel.
Stage 4: Abandoned Mine; Reference Letter: F - From the top of the chapel, you'll drop down into the upper caves that lie just below the surface. As you'll see in the background, many monsters who worked to tunnel these areas are imprisoned in cages. Nice reward, 'ey?
Stage 4b: Catacombs; Reference Letter: F - If you fell off of the pillars in stage 3, you're punished by falling even deeper than usual. But the long distance you travel may pay off--if you're not worried about the best ending. These ancient mud-filled caves will test your resolve, and putting up with their annoyance will let you skip a stage.
Stage 5: Inner Den; Reference Letter: W - Once you ascend from the underground areas, you'll arrive here. This is the most heavily-guarded area of the castle, and it'll be your job to penetrate the maze-like passages to get back on the right track.
Stage 5b: Hidden Springs; Reference Letter: S - The castles water supply can be found in one of the rightmost towers. You're only allowed to break off into this area if you've saved the right people. The water itself will only a problem if you fall into it.
Stage 6: Clock Tower; Reference Letter: K - The inner den skips through the library and takes a direct route here, while the hidden springs allow you easier, more straightforward access. The tower is much shorter than usual, but the awkward enemy placement more than makes up for it.
Stage 7: Castle Keep; Reference Letter: L - From the clock tower, a familiar-looking stairway takes you through the armory (P), around, and into the castle keep. There's no stairway that leads to the keep, though, and the throne room has taken on a new look.
Page 3: The Bloody Road Continued | Back
|
[Home] [What's New?] [CV Library] [Stages] [Reviews] [Weapons] [Castleography] [Multimedia] [Codes] [Links] |
||||


